Monday, 3 November 2025

 This blog has been abandoned for a while. Like all good things, it’s time to resurrect it in order to document some of the SCA (Society for Creative Anachronisms) based activities I am currently finding joy in. Unsurprisingly it’s still deeply food oriented, with a decent swipe of  DIY/craft/general holidays.


Elderflower cordial

Mitre saw & work bench updates

About 24 hours after W finished the work bench, we had a nasty unpleasant accident. Whilst cutting through a small piece of wood, the mitre saw 'kicked back' hard, then the safety cover slapped down and everything stopped. Completely. We couldn't work out what was wrong and so we shipped it out to Makita for repairs.

After a long wait, we finally heard back - they believed the damage was due to the saw being dropped and therefore it wasnt covered by the warranty. All repairs would have to be paid in full - and the total cost was just 20 euros less than a completely new saw. We spent a lot of time frustratedly trying to work out when it could possibly have been dropped - and realised there was one point in time that did indeed fit the bill - not a major fall, but enough to qualify. So, fair play in the warranty sense, but both W & I are not terribly impressed with the robustness of Makita mitre saw, if it is that easy to destroy so fundamentally. With the costs of the repair so close to the price of new, it was an easy decision to make to buy new to ensure that there are no remaining niggles - and an equally simple decision to decide to move away from Makita. Sad because it had been good so far, but really not impressed with its durability in a working environment. W settled on a deWalt so looking forwards to seeing how it works out. 

However, we did discover a new challenge on the deWalts arrival. The beautiful worksaw table that W spent so much time on, doesn't fit the new saw. The base area is too small and the height of the wood support areas are now too low. More fixes.

Friday, 30 December 2016

New Years Resolutions - checking in.


Its been a busy year - like always! And so busy that from about halfway through the year I ran out of blogging steam. Its cold and crisp and as a result I'm happy to warm up by tapping away ona keyboard again - hopefully this will last a little longer again.

As its nearly 2017 I thought I'd check in on my NYRs and see how I did over the year : 66/106 completed - just over a 60% hit rate!! Like most to-do resolutions some things floated on to the list with urgency - rewiring of lights and switches and central heating repairs - and some things floated off the list in terms of priority or importance : we have decided to delay the work on the top floor for another year, and we decided that a lovely holiday was far more important than a new garden shed and garage!

All in all, there are two resolutions that I'm sad that we missed. One was teaching Luca basic recall - he's still deaf and blind when outdoors and as a result needs to be on the lead at all times. It's still being worked on and hopefully this coming year we will achieve it.  The other  one I'm sad to miss out on was the quarterly visits to a spa - perhaps I should add that back onto the list for 2017!


How did you do with your 2016 plans? 


  1. Clean & stain IKEA patio table, chairs & bench 
  2. Lay tiles in utility cupboard
  3. Replace waterproof silicon edging at back of kitchen sink/kitchen surface
  4. Grout the tiles under the craft table
  5. Repair edge of kitchen patio
  6. Fit draught excluder to mudroom
  7. Repair exterior giant table on main patio
  8. Repair glue pipe of rear gutter & do extension into grid
  9. Repair garden bench
  10. Fill crack in the wall by back door
  11. Mount curtain poles in the living room
  12. Make window fillers for the circular windows
  13. Make window shutters for the circular windows
  14. Lay  drainage pipe down to the canal
  15. Clean tiles on roof
  16. Replace top half of rear stable door
  17. Finish floor in the stables cupboard room
  18. Stable cupboard room inject DPC 
  19. New lights in the stable
  20. Mudroom doors on the cupboards to be made & hung
  21. Craftroom doors on the cupboard to be made & hung
  22. Whitewash wood in craftroom
  23. Whitewash wood in mudroom
  24. Repair & repaint dog scratches
  25. Build a mud & water catcher tray
  26. Mini diamonds for the gate to stop the dog escaping
  27. Replace exterior pole light near house
  28. Eat more healthily & take home made food to work at least twice a week
  29. Brick edging for garden beds
  30. Second coat of paint on the gates & fences
  31. Fix the wooden arch  base between rose  & flower bed 
  32. Make up a wooden pane and tile the hole in the laundry room
  33. Install squares on the gate tops at the front
  34. Hem curtain in hall
  35. Glue harp trim
  36. Mosaic stones for garden walkways
  37. Home made curtains for craftroom
  38. Home made curtains for mudroom
  39. Finish putting coving around the ground floor : hall, mudroom, craftroom, bedroom, laundry room. wardrobe, bathroom, kitchen. ( only done the living room so far!)
  40. "Beschoeing" along the front edge of the garden - timber edging with bespoke vole exits & cat ramps to stop the garden from being washed away by the canal flow
  41. Lay the garden footpath from gate to kitchen patio, from gate around trees to the boardwalk under the trees
  42. Make a fishing boardwalk under the trees!
  43. Install anti-leaf devices in the gutters to encourage leaves not to settle in them!
  44. Remove the old dog pen
  45. Drink more water!
  46. Level and lay new turf around front & garden side of the house
  47. Finish dining room chair makeovers
  48. New lamp near house, and a new lamp by the gate
  49. Lay matting around the fruit trees
  50. (More) Raspberry frames - make and train raspberries up them
  51. Make raised beds for the kitchen garden
  52. Grow a summer feast in the raised beds!
  53. Build the new garden shed & garage
  54. Finish the Pfaff table upcycle
  55. Finish the Singer table upcycle
  56. Repad/stuff Granddad's old chair
  57. Craft an elf village for the trees
  58. Extend the removal of nettles throughout the garden, as far as the hay barn.
  59. Repair the haybarn
  60. Gingerbread trim for the conservatory
  61. Mosaic the postbox base
  62. Accomplish at least 1 upcycling or crafting project per month
  63. Complete design of first floor & above with the architects
  64. Powerwash stables
  65. Repaint all the woodwork on outside of the stables - 'heraldry' on stall shutters
  66. Repaint stable interior
  67. New tiles - mudroom, hall, kitchen (maybe delay until after first floor work?)
  68. Home made Xmas decorations - wood tree
  69. Octagonal bench around the chestnut tree
  70. Wooden flower boxes on the kitchen patio
  71. Reduce wardrobe clutter by 50% in a journey to a minimal & organised wardrobe life
  72. Standing bar tables  made by W in wood
  73. Move the laundry line & rebuild
  74. Make a rotating rainshield for laundry line (maybe?) 
  75. Chill out at a spa at least once per quarter!!
  76. Garden lighting
  77. Make boot remover
  78. Make giant garden games
  79. Clean blinds in kitchen
  80. Clean blinds in conservatory
  81. Powerwash all patios & stonework
  82. Re-sand the brick flooring 
  83. Make moss art on the back of the stables
  84. (WT)Fit new garden doors
  85. (WT)Re-do bathroom ceiling : replaster, repaint
  86. (TZ) re-lay rear patio
  87. Teach the hound to come so that we can run and play on the beach together without a leash
  88. Lay out a chequer board herb garden
  89. Wildflower meadow on the banks of the canal ( opposite side)
  90. Treat & repair wood in the riding ring 
  91. Treat & repair wood in the starvation paddock
  92. Clear & relay central walkway between ring & paddock,
  93. De-weed starvation paddock - Zen garden layout
  94. De-weed riding ring - zen garden layout
  95. Clear out stuff in the loft and send at least a car load of stuff off to a better (new)  home
  96. Build a clay wood oven for making pizza near the BBQ
  97. Have a giant summer barbeque!
  98. Prune old fruit trees
  99. Remove old concrete blocks from the front & 
  100. clear/plant the front area
  101. Get old grain store cleared
  102. Remove asbestos shed ( subject to building new shed)
  103. Level floor in the stables (?new concrete?)
  104. Breed ladybirds for the lime trees
  105. Keep n do a good job in my day job
  106. Relax, be happy, and garden on!

Wednesday, 31 August 2016

Summer harvest

'The summer's been super busy!

I've been just about keeping up with the basics in the garden and in the kitchen beds, and we've had an amazing harvest for the last two months. We've almost stopped going to the supermarket for fruit and vegetables, and next year we will be even better at growing things.

Here's a quick summary of our crops :

- we had an early and (rich) harvest of elderflowers
- lots and lots and lots of lettuce, more than we could eat!
- our chard crop has been abundant and continuous, true to form as a cut and come again crop
- our cauliflower was quickly infested with cabbage white butterflies, but we still got a couple of lovely dinners from it
- radishes didn't win this year - with all the hot cycles, they pretty much bolted so we didn't get any lovely crunchy globes. BUT we got lovely rat-tail seed pods which freeze excellently and bring a beautiful peppery bite to stir-frys
- Our peas  & mangetout were prolific and long-lifed - enough to take us through to the various bean family plants. We've also had a continuous flow of winged peas which are an interesting variety which occasionally goes a little woody
- tomatoes looked like they were going to be awesome, with lots of heavy trusses. Then sadly, tomato wilt struck and we lost all the plants in the space of two weeks. Luckily we managed to get a solid harvest of green tomatoes and have had lots of fried green tomatoes with beautiful deep south flavours.
- the potatoes were taken off in the same blight, but we have a few potatoes that we are slowly harvesting from the remains.
- beetroot & turnip have been steady but bijou treats as the evenings have shortened, and carrots continue to be a lovely crunchy explosion of flavour
- pumpkins & courgettes are just kicking in and I'm looking forwards to some lovely roasted vegetable melanges
- still to sample are the celery, leeks, artichokes, onions and mexican cucumbers

The summer fruit have been delicious but far too small as a harvest - raspberries and strawberries - but autumn's harvest of pears is so huge, we'll be eating pears for the whole winter.  I don't think we will have a lot from the new orchard, as the trees are still bedding in, but I'm hoping for enough crab apples to make crab apple jelly.


Monday, 30 May 2016

How to edge a river bank to protect and shore your garden from erosion

One of the mixed blessings of living in the Netherlands is the large amounts of water. You are never more that than a stone's throw away from a canal or river or ditch, and it's almost inevitable (if you live outside the major towns) that you will end up with water running near your property. In our case, we are bounded on 4 sides by drainage canals that form a small part of a complex drainage system that keeps this below sea-level corner of the Netherlands dry. It brings joy with an ever present procession of wildlife - we have ducks, moorhens, swans. coots, kingfishers and herons all within a few steps outside our door.

However with the constantly moving water, and the annual commitment to dredging out of the canal to ensure silt doesn't build up, erosion is a real and present problem. Around the fields, it's easy to see that the waterways have widened significantly over the years. Around the house, the banks are managed on one side by a line of mature lime trees, who's roots have bound up the soil tightly and act as a natural edging. At the front however, you can see the remnants of the old 'beschoeing' or river edging with a few rotten spikes intermittently sticking up about a foot or more away from the bank. When W had to mess around in the water to put the new gates in, he found out the hard way that whilst the main canal is shoulder deep, the old edging has slowed erosion sufficiently that there is an underwater bank that is only knee high deep. Sadly we weren't quick enough with a camera to capture the experience - and with forewarning, no-one else seems sold on the idea of recreating it.

We decided that we wanted to replace the front edging for two reasons - one, to stop the erosion and stabilize the banks and secondly to limit the amount of damage the resident muskrats are doing to our front lawn. Muskrats are avid tunnelers and leave as comprehensive a set of networks as your average mole - but significantly larger in diameter. These regularly collapse, scenting the air with a tempting aroma that no self respecting Great Dane can ignore - triggering some mad digging by one of the most efficient canine-destruction machines you've ever seen : a GD puppy on the hunt!

Lots of research later we decided that doing it the old fashioned way - by hand - would be the way to go and that we felt confident to do it ourselves with lots of help from the lads. We followed plans from http://www.bakkerdehouthandel.nl/ and had all of the materials delivered from them. (All credit for the graphics are bakkerdehouthandel and we recommend getting materials from them - they have an easy onsite calculator to work out exactly how much you need!).

The process consists of sinking poles into the basal mud layer. Each pole needs to be 2/3rd sunk, and 1/3 boarding to shore up the edging. The gap between each pole is a maximum of 50 cms apart as illustrated in this diagram

Optie Palen

You then attach boards horizontally along the poles to provide at least one board height above the waterlevel and boards all the way down through the water to the base level of the river. The boards go on the inside of the poles so that the soil pressure pushes them against the supports.
Optie Planken
The boards are attached using bolts to the main poles and a horizontal bracing bar is applied on the outside ( waterside) of the poles to prevent warping and to give additional support for the land anchors.

Optie Gording

Finally you attach anchors into the soil to ensure that the boards & poles have support and don't slide outwards over time. You add a layer of plastic to stop the soil from filtering through the cracks on the inside (land) of the boarding, and you back fill the gap between where you are boarding and where your bank actually is with large amounts of soil. Let it settle, stomp it down, repeat the filling until the ground reaches the level you want. Finally top off the poles with a flat board to give you a more presentable front and an edge to sit on.

Optie Afdeklat


Looks easy, doesn't it? So....no issues, right? Well here's how it *really* went!

The first task was to measure up and plan how much wood and boarding we would need, Whilst nominally this isn't a terribly hard task, given the clear instructions from deBakker, it's surprisingly hard to measure in a straight line, and to balance on a narrow muddy edge when there is a Great Dane  who thinks that the sole reason you are in the canal is to play ball with him. Luca spent most of the afternoon pointedly dropping his ball in the canal and nudging it away into the middle of the canal whilst staring pointedly at poor W - who was freezing, grouchy and not happy with his childhood flashbacks of retrieving balls from water!

Once the wood order and the crew had assembled the next challenge was how to assemble and put together the frame. W & team quickly decided after advice from our neighbor F that the way to go was to assemble lots of individual panels on dry land, to attach the large flat boards on to the main poles and to sink each panel as a block into the muddy base. They then chose to attach the reinforcing strip once the panels were in place and to do the same with the mud guard plastic and the anchors.

The first panel made it quite clear just how TOUGH a good hardwood is - and you definitely don't want to be using softwoods underwater. Within the first 3 hours, we had burnt out 3 drill bits and burned out the motor on a deWalt rechargeable drill. Knots and just the sheer number of holes needed made this an incredibly tough activity. Note to the wise : you want to drill slowly and steadily, not at max power, and take time to clear the drill bit of sawdust regularly.
Eventually the team got into a good steady rhythm that allowed consistent progress, without destroying machines & tools. All the movable woodworking tables that W has made over the last few months came into their own and we were able to use them outside in the sunshine to get maximum throughput Here's the assembly line in progress!

With the first panel done, the team decided to try placing it immediately to work out what the challenges were ahead. The dream team grabbed the first panel- with all of their proposed boards attached to it and headed out to the water to start sinking it into the riverbed. They very quickly realized that a) its remarkably hard to hammer 5 poles in simultaneously  and b) when you screw up on the location, and have to move it sideways, it's REALLY hard to pull it back out of the mud to re-position it! We learned a valuable lesson early on : be willing to improvise a little on measurement - sometimes although the letter of the law calls for 5 boards, reality of the river bank only allows 4! We also learned that the action of hammering the poles caused the tops to split and crack quite a lot. Luckily we had purchased extra long poles, so by moving the board placement further down, we gave ourselves a much longer level of pole at the top, that we could cut off later on with a reciprocating saw. Easier to hammer, and less traumatic when you splinter off chunks!

After first day creating panels, it was back to the task of placing them in the river on the second day. Unfortunately the remnants of the old 'beschoeiing' rapidly proved to be a problem, with the old collapsed frame getting in the way of the new poles. Electric tools and water don't really mix very well, so we had to revert to good old fashion hand tools and my trusty bow saw for tree surgery got called into action. Luckily the weather was on our side with glorious hot & sunny days making up for the fact that water was glacially cold and very very very murky! Each footstep through the mud released methane from the decaying plant materials making the whole exercise particularly fragrant!

At the end of the third day we'd completed fitting the right hand side of the bank and discovered some of the challenges we had created for ourselves with sinking the gate posts into the water. It wasn't too much of a problem to the right of the gate as it was not far overhung, but on the left we had to do a long diagonal slice around the fencing and come up with new creative ideas to stop Luca from traversing out to freedom.

 The dream team also came up with interesting ideas on how to balance out across the water, in order to keep momentum and power behind their sledgehammer strokes when the bank and boarding had significantly parted company. It gave us inspiration for a later innovation : the cat scramble board or duck boards - to help animals which don't want to remain in the water to get safely out. As both Lumikki and Jesper had fallen into the canals within days of being allowed out to roam, I want to be sure that the wooden edging doesn't have fatal results when one of them misjudges their steps.


Once all the boards were in, it was time to attach the plastic material that stops the soil from trickling away. This is done on the inside, along the line of the main retaining baton. Once attached,the main retaining strip put in,and the ground anchors attached, it was time to start to long hard graft of back-filling the soil gap. Luca had decided early on that it was HIS fort, and that he was the king of the castle! It gave him a perfect location to supervise the work that everyone was doing and to provide his own personal commentary to the proceedings!

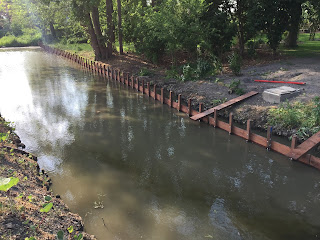
Once back-filled, we took a few days off to let the soil settle, and to find out if we'd missed any sneaky corners where the soil was trickling away. This seems to be an inevitable part of the process, and we were lucky to only have one 'leak'. Once settled it was top up time then we needed to remove the top extension of the pole down at the board height and to attach the flat board over the top to finish it off. Whilst initially the boarding looks really 'wonky' - wavering all over the place with no real straight lines in place - once the retaining bar and the top was laid on, it was amazing how much the movement disappeared. From the far side of the river, it looks beautiful and smooth with a gentle curve that mirrors the shape of the land.


5 days of hard work later (plus a few waiting days ) and we ended up with a beautiful new canal edge. The observant among you will have spotted the extra special add on that we made -  I'll talk more about in a later post - a fishing boardwalk!


Thursday, 26 May 2016

Update on New Year's resolutions....

Wow, have I got so much to share with you all! I've been super quiet for a few weeks because the boys have been over and we've been working hard to plough through our 2016 list. And oh my, we've done so well! We've had fun and dealt with a dozen curved balls and still managed to work like crazy!

I know it's not yet the quarter end but I cant help but celebrate how much progress we've made against the list - and done lots of other new things as surprises come along. The plan for the next few weeks is clean up all the dust, get my diet of food back onto good healthy stuff and blog blog blog blog!

Annotation : Strike through is done, italics is well in progress
  1. Clean & stain IKEA patio table, chairs & bench 
  2. Lay tiles in utility cupboard
  3. Replace waterproof silicon edging at back of kitchen sink/kitchen surface
  4. Grout the tiles under the craft table
  5. Repair edge of kitchen patio
  6. Fit draught excluder to mudroom
  7. Repair exterior giant table on main patio
  8. Repair glue pipe of rear gutter & do extension into grid
  9. Repair garden bench
  10. Fill crack in the wall by back door
  11. Mount curtain poles in the living room
  12. Make window fillers for the circular windows
  13. Make window shutters for the circular windows
  14. Lay  drainage pipe down to the canal
  15. Clean tiles on roof
  16. Replace top half of rear stable door
  17. Finish floor in the stables cupboard room
  18. Stable cupboard room inject DPC 
  19. New lights in the stable
  20. Mudroom doors on the cupboards to be made & hung
  21. Craftroom doors on the cupboard to be made & hung
  22. Whitewash wood in craftroom
  23. Whitewash wood in mudroom
  24. Repair & repaint dog scratches
  25. Build a mud & water catcher tray
  26. Mini diamonds for the gate to stop the dog escaping
  27. Replace exterior pole light near house
  28. Eat more healthily & take home made food to work at least twice a week
  29. Brick edging for garden beds
  30. Second coat of paint on the gates & fences
  31. Fix the wooden arch  base between rose  & flower bed 
  32. Make up a wooden pane and tile the hole in the laundry room
  33. Install squares on the gate tops at the front
  34. Hem curtain in hall
  35. Glue harp trim
  36. Mosaic stones for garden walkways
  37. Home made curtains for craftroom
  38. Home made curtains for mudroom
  39. Finish putting coving around the ground floor : hall, mudroom, craftroom, bedroom, laundry room. wardrobe, bathroom, kitchen. ( only done the living room so far!)
  40. "Beschoeing" along the front edge of the garden - timber edging with bespoke vole exits & cat ramps to stop the garden from being washed away by the canal flow
  41. Lay the garden footpath from gate to kitchen patio, from gate around trees to the boardwalk under the trees
  42. Make a fishing boardwalk under the trees!
  43. Install anti-leaf devices in the gutters to encourage leaves not to settle in them!
  44. Remove the old dog pen
  45. Drink more water!
  46. Level and lay new turf around front & garden side of the house
  47. Finish dining room chair makeovers
  48. New lamp near house, and a new lamp by the gate
  49. Lay matting around the fruit trees
  50. (More) Raspberry frames - make and train raspberries up them
  51. Make raised beds for the kitchen garden
  52. Grow a summer feast in the raised beds!
  53. Build the new garden shed & garage
  54. Finish the Pfaff table upcycle
  55. Finish the Singer table upcycle
  56. Repad/stuff Granddad's old chair
  57. Craft an elf village for the trees
  58. Extend the removal of nettles throughout the garden, as far as the hay barn.
  59. Repair the haybarn
  60. Gingerbread trim for the conservatory
  61. Mosaic the postbox base
  62. Accomplish at least 1 upcycling or crafting project per month
  63. Complete design of first floor & above with the architects
  64. Powerwash stables
  65. Repaint all the woodwork on outside of the stables - 'heraldry' on stall shutters
  66. Repaint stable interior
  67. New tiles - mudroom, hall, kitchen (maybe delay until after first floor work?)
  68. Home made Xmas decorations - wood tree
  69. Octagonal bench around the chestnut tree
  70. Wooden flower boxes on the kitchen patio
  71. Reduce wardrobe clutter by 50% in a journey to a minimal & organised wardrobe life
  72. Standing bar tables  made by W in wood
  73. Move the laundry line & rebuild
  74. Make a rotating rainshield for laundry line (maybe?) 
  75. Chill out at a spa at least once per quarter!!
  76. Garden lighting
  77. Make boot remover
  78. Make giant garden games
  79. Clean blinds in kitchen
  80. Clean blinds in conservatory
  81. Powerwash all patios & stonework
  82. Re-sand the brick flooring 
  83. Make moss art on the back of the stables
  84. (WT)Fit new garden doors
  85. (WT)Re-do bathroom ceiling : replaster, repaint
  86. (WT) New bathroom!
  87. (WT) New fridge, oven & extractor fan
  88. (TZ) re-lay rear patio
  89. Teach the hound to come so that we can run and play on the beach together without a leash
  90. Lay out a chequer board herb garden
  91. Wildflower meadow on the banks of the canal ( opposite side)
  92. Treat & repair wood in the riding ring 
  93. Treat & repair wood in the starvation paddock
  94. Clear & relay central walkway between ring & paddock,
  95. De-weed starvation paddock - Zen garden layout
  96. De-weed riding ring - zen garden layout
  97. Clear out stuff in the loft and send at least a car load of stuff off to a better (new)  home
  98. Build a clay wood oven for making pizza near the BBQ
  99. Have a giant summer barbeque!
  100. Prune old fruit trees
  101. Remove old concrete blocks from the front & 
  102. clear/plant the front area
  103. Get old grain store cleared
  104. Remove asbestos shed ( subject to building new shed)
  105. Level floor in the stables (?new concrete?)
  106. Breed ladybirds for the lime trees
  107. Keep n do a good job in my day job
  108. Relax, be happy, and garden on!
  109. A new bath tap
  110. Rainshield on mudroom window
  111. Rollers on the gates
  112. Repair front guttering
  113. Make a new garden bench 
  114. New ironmongery on the paddock gates
  115. Clear out the garden shed & skip all the trash around the site.