

We got the quotes in last week for the work we need to do to sort out the water problems at the back of the house. Needless to say, they were quite scary. Just to get a new drain along the back roof edge was over 2000 euros! And that's before we even started to work out how to deal with the rest of the water issues. I think you can guess what we decided to do next then!
We said we thought we could do it ourselves, and as we also had the expert guidance of IDD for a few more days we decided to dive in - how hard could it be? Silly question!
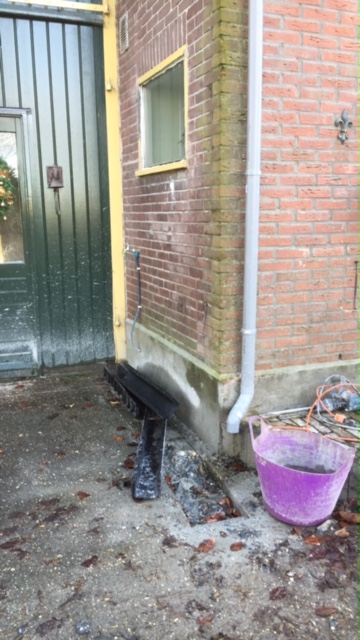
The rear gutter has a single pipe draining down into the sewers. It is in the centre of the gutters which are made of PVC lined wood - and over time they have warped so that the far left collects water and fountains it over the edge instead of pushing it down the pipe. The drainage pipe itself goes down into very old brick walkway, that's raised above the level of the surrounding concrete. The various ideas suggested by companies were to
- completely replace the gutter so that the new angle ensured drainage towards the center.
- add a new pipe at the left side and dig down through the concrete and grass bank to lay a pipe to the canal. Since it's just rain water, that's fine.
- in addition, we needed to find someway of dealing with the rain pouring off the thatch overhang by the mudroom which was being channeled by the concrete into the mudroom walls. Here as well the suggested route was to dig up the concrete and either add real or french drains.
 We decided to go for the second pipe and to dig up the concrete. We hired a concrete slicer (?) and a jackhammer, got together all the pipework we needed, an extra shovel and got going. Step one was drilling out a circular hole in the wood/PVC gutter and using an external silicon glue to fit a connector in. IDD then mounted the rest of the pipe, using pipe rings attached to the wall but held off sealing it together until the drains were ready to be linked to. We have the glue for sealing it, but as we will need it to move around to fit to the ground drain, we will do that last. You can see the green lichen on the wall, from the water flooding over the edges of the gutters.
We then started to slice out our lines and then jackhammer out concrete. OH MY! If ever you wonder why all those workmen have bulging forearms and great muscle definition - try using a jackhammer for an hour or so. It's the most disconcerting, crazy, exhausting thing I've done so far. As we broke through the first surface we realized that this wasn't just concrete - this was steel mesh reinforced concrete with added vavavoom! Luckily W has a metal cutter so we were able to take the surprise in our stride and keep going. After tussling with the jack for a while, I decided to volunteer to be chip-skivy : collecting up all the broken pieces of concrete and moving them to our dumping ground behind the stables. Frank, our friendly neighbor came wandering by and mentioned that he thought it might take us a while to break it up. Apparently he laid it with his father, back when this was a working farm and they made it strong enough to deal with tractors and lorries and all sorts of machinery. He really wasn't kidding : two days later we finally have the drain areas clear of concrete, but it was dark again and we were so exhausted we decided to continue the project next week. Here's our parting site view, just before final clean up :

It rained cats and dogs during the night on Saturday - and we saw some immediate improvements : now the ground is open, the rain soaks away steadily, rather than standing against the house. Now we just have to get the drains down to help it move more quickly to the canal!
No comments:
Post a Comment