Showing posts with label tools. Show all posts

Thursday, 14 April 2016

Making a workbench for a mitre saw

This winter has definitely been laying the groundwork for the heavy lifting we will need to do next year when we take on the new levels in the house. Tools have been at the heart of everything - whether they are garden tools or woodworking and DIY tools. W has spent hours poring over reviews on the interweb before deciding on each and every purchase. The tools aren't enough, though - you really need work benchs for tools to be able to work at their optimum level.

As a result, W has been busy making up a workbench to run the mitre (or miter, if you are american!) saw on. We've had it sat on an old tumble dryer as a stop gap, but it's not really safe and secure, so getting it onto a long term home was quite important.

For doing a lot of this sort of foundational work, W has been using a cheap and cheerful white deal plank that we buy in bulk from our favourite wood merchant. The first task was to work out the measurements - we used an online design as the base pattern , but needed to adjust the height to fit the specifics of the Makita mitre saw that we have, and wanted to make it 4 meters 40 cm  wide, and 60 cm  deep to accommodate European wood sizes. Once that was done, it was chopping time - cutting all the required lengths of planking to size. Then on to using a kreg jig to make the recessed screw holes to fit the 90 degree joins together.


Once everything was ready to assemble, time to get busy with the wood glue and screws. W has made a template to make sure that the corners are at 90 degrees true when being screwed together and you can see it in use here, with clamps holding it in place.


Once the main frame was assembled it's time to move onto the top surfaces. You can see that the sides are both higher than the central dipped area : the dip is where the mitre saw sits as it's got quite a high base. This means that you can support long planks on both sides of the workbench  on the flat surfaceand not have to juggle madly whilst cutting. Definitely a safety advantage! The main surface is a cheap composite board, that can be easily replaced if it gets damaged.


Last but not least, to make sure that we can move the workbench reasonably easily, W added roller wheels at the base. It looks gorgeous and hopefully it's going to be worth it's weight in gold soon!


Monday, 16 November 2015

Autumn's gold


Some of these posts may seem a little bit out of sequence because I am playing catch-up on a summer's worth of work in my blog. But the autumn weather has been beautiful - grey clouds shooting across the sky, winds whipping around corners, catching leaves and scattering them across the garden like stolen treasures. It's a constant battle to keep the concrete clear of leaves so that the cars have grip and grass disappears overnight in a golden blanket. 

I just had to share a few pictures of my 2 favourite men playing in the leaves. Luca's been having a complete blast and is burning up so much energy kicking up the leave piles, that he's curled up asleep from about 6 in the evening onwards. As you can see, it's not just Luca having fun!


Quick tool update - the  Stihl kombisystem has come into play again. We were super excited to find that it has a leaf blower attachment. It's cheaper than buying a standalone leaf blower - and because the base engine has to be capable of cutting brush, it's much more powerful than most blowers on the market. I'm also grateful for the ear defenders - it doesn't get any quieter!


We've been using an old silo bin as storage for our compost and garden waste - it drops about 2 feet down below ground level and is well contained to stop leaves from blowing out. With every run to the silo, I feel more and more like Smaug the dragon building my own personal gold mountain.


Thursday, 12 November 2015

Marshmallows 'n' meat - building a fire pit area


As we planned the first tranche of work on the house - the 'must do before the house is fit to live in' work - I got a message from W : 

'I want one'


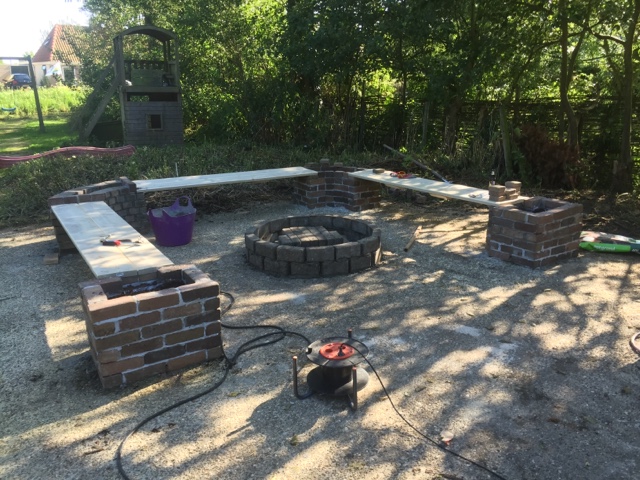
Clearly, this was indeed a mission-critical component, and no red-blooded Dutchman would ever move into a new house (even a thatched one) without a substantial flame source on which he can char large amounts of meat. Being a nice person, and well, wanting the Dutchman to feel welcome, I agreed and broached the subject of the additional workload with the 4 man work crew - I, D, A, & M.  I expected groans of dismay and complaints that actually I was asking them to do far too much in far too little time. Instead, they all agreed immediately with the vitality of this home component and dived into planning. Evenings were spent poring over scribbled diagrams with approximate measurements discussing the pros and cons of different building approaches, all with bottles of beer in hand.  Finally a design was chosen, a location was sourced and our collection  of random spare bricks started to get put to a good use. 


We had a lot of shaped bricks that had been used to make a pattern in an old driveway which D used to make the corner stands. I loved the beautiful curves in the initial bench base, but wasn't so sold on the decision to have the bench's positioned so that you saw nothing of the garden but stared at a scrubby fence through the fire. With great innovation, D promptly set to work on making it a 3 bench rather than 2 bench barbecue site which made everyone happy  - extra seating to move around as you try to avoid the Smoke Fairy. D used a concrete mix that was quite high strength and self mixed here in the garden. You can buy ready mixed bags that you only need to add water to, but they cost a lot more that buying some Portland cement, some sand and a mixer. We used a Dutch brand - Swinko - but something like this one should also work. Although you can do this all by hand, the mixer makes a huge difference to how much work it is to prepare everything before you can even get started.


After a day of laying bricks the main benches and their stands were all in place, and D has started on the central circle for the firepit. We invested in heat resistant cement to help withstand high temperatures here - ordinary concrete may simply crack and break when exposed to heat & flame. As we knew we were going to be putting a cast iron fire pit for the actual cinders, we didn't have to build the whole circle with it, and just made sure the inner areas were secure. Because we were going to have a tripod stand for the grill and for hanging pans from, D left 'footholes' at the base of the ring to keep the tripod secure and safe from being tripped over in the dark.


Here's the completed barbecue area, with the brickends planted up with aromatic lavender and rosemary - lavender to brush against, rosemary to sprinkle on your steak or chicken breast on the grill. And of course, once you've built a firepit, you have to test it and just *HAVE* to roast marshmallows on it. So here's a quick picture of the crew testing marshmallow and beer combinations at the day's end. 


It's seen a lot of use since, with all ages enjoying marshmallow in various forms of toastyness.....and yes, they had meat on the grill as well. 


Wednesday, 11 November 2015

Toy shopping part 1 : mowers


For the grown up children in the family, the most fun part of the renovation has to be all the wonderful new toys that they get to play with. With 9600 sq metres of grass to mow, a small electric handmower really wasn't going to cut the mustard - and all the renovation work needs tools as well. July saw a massive shopping spree with some very happy gentlemen wandering around hardware shops with more glee than a posse of 10 year olds in a Lego store.


It's been an interesting balancing act : ensuring that the tool is utilitarian & effective, yet at the same time is good value for money, hardwearing enough to stand up to the wear it's going to get, and has enough engineering to reduce some of the hard work out of the equation. 
The first item on the shopping list was the ride on lawn mower : the previous owner had committed to leaving behind her old one, but had changed her mind and sold it pre-d day. We are lucky enough to have a super family store near us that stocks an amazing range of these items : Breider Tuinmachines is one of Noord-Hollands best little companies in my opinion. The store is generally manned by father and son, who are helpful, cheerful and more than willing to advise on options.  We still had to go through a steep learning curve about what's good and what's not good in mowers : 
  • Do you want to mulch or collect your clippings? 
    • Collecting leaves a much neater finish overall and when you have to drive over areas of non-lawn, means you don't end up with needing to brush them down/remove cut grass from pathways.However you do need to constantly run back and forth to the compost heap, unless you choose the same approach as the last owner who randomly dropped the clippings in the weed banks as she drove past. 
    • Mulching puts the grass back into the soil by dint of chopping it very finely, but you are guaranteed to be traipsing grass clippings back into the house for the next day or so - and the animal paws will all be green!
  • Are the blades at the front or in the middle? 
    • At the front gives you much more visibility when cutting and it's much easier to ensure you cut straight lines and maintain your pattern, but the price tag is higher
    • Many lawnmowers are now 'zero turn radius' with big swivel components at the front which allow you to mow much faster and to spin on the spot at corners  - but again, higher in price
    • Middle is cheaper and fine if you are doing long lengths of repeated cutting
    • Does it have reverse? Essential if you have lots of trees and bendy areas to manoever around
    • How quick is it? How powerful? Although you would normally mow at about 4mph (7mph on ztr's) when you are zipping from location to location, you really notice the lack of speed. And if it's slow when mowing and it's a big area.........
    • How hard is it to clean? Because you will need to clean the blades and declogg the grass cuttings from the blade housing. 
    • Can you tell if you are about to run out of fuel? Not that much of a problem for us, as you are never that far away from the house, but if you had a very long plot it might be a worry!
    • How big is your mowing area - and how big is your blade? A small blade can take a mighty long time and it's amazing how much it adds up!

     As it was an unplanned purchase and not in our initial budget structure we decided to opt for a secondhand Husquarna ride-on with a 6 month warranty. It's not been trouble-free, but Mr Breider drops in after he's done in the shop and fixes it promptly every time. With it we also got a set of noise cancelling headphones, something that I'm super grateful for after an hour of boucing around trimming the orchard fields.


    Of course, it's not enough to just use the ride on  - you can't get close to the canal water on the sloping edges and you can't get too close to the flowerbeds for fear of cutting the few remaining flowers. So we also had to get a petrol powered Flymo. It's an entirely different experience than an electric Flymo, and reminds me so much of the hovercrafts that I used to ride between Dover and Calais on day trips. It gently hovers just above the ground whilst belching fumes until it warms up. It's super efficient at cutting grass and building forearm muscles at the same time.

    So, take up gardening, save on gymn fees, get fit! Who knew?