Thursday, 12 November 2015

Marshmallows 'n' meat - building a fire pit area


As we planned the first tranche of work on the house - the 'must do before the house is fit to live in' work - I got a message from W : 

'I want one'


Clearly, this was indeed a mission-critical component, and no red-blooded Dutchman would ever move into a new house (even a thatched one) without a substantial flame source on which he can char large amounts of meat. Being a nice person, and well, wanting the Dutchman to feel welcome, I agreed and broached the subject of the additional workload with the 4 man work crew - I, D, A, & M.  I expected groans of dismay and complaints that actually I was asking them to do far too much in far too little time. Instead, they all agreed immediately with the vitality of this home component and dived into planning. Evenings were spent poring over scribbled diagrams with approximate measurements discussing the pros and cons of different building approaches, all with bottles of beer in hand.  Finally a design was chosen, a location was sourced and our collection  of random spare bricks started to get put to a good use. 


We had a lot of shaped bricks that had been used to make a pattern in an old driveway which D used to make the corner stands. I loved the beautiful curves in the initial bench base, but wasn't so sold on the decision to have the bench's positioned so that you saw nothing of the garden but stared at a scrubby fence through the fire. With great innovation, D promptly set to work on making it a 3 bench rather than 2 bench barbecue site which made everyone happy  - extra seating to move around as you try to avoid the Smoke Fairy. D used a concrete mix that was quite high strength and self mixed here in the garden. You can buy ready mixed bags that you only need to add water to, but they cost a lot more that buying some Portland cement, some sand and a mixer. We used a Dutch brand - Swinko - but something like this one should also work. Although you can do this all by hand, the mixer makes a huge difference to how much work it is to prepare everything before you can even get started.
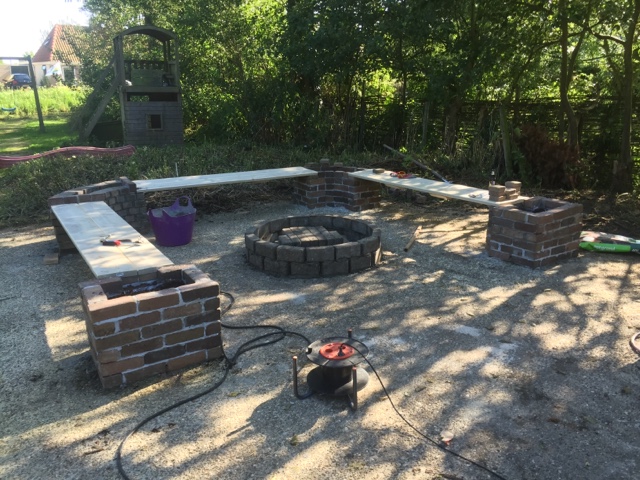

After a day of laying bricks the main benches and their stands were all in place, and D has started on the central circle for the firepit. We invested in heat resistant cement to help withstand high temperatures here - ordinary concrete may simply crack and break when exposed to heat & flame. As we knew we were going to be putting a cast iron fire pit for the actual cinders, we didn't have to build the whole circle with it, and just made sure the inner areas were secure. Because we were going to have a tripod stand for the grill and for hanging pans from, D left 'footholes' at the base of the ring to keep the tripod secure and safe from being tripped over in the dark.


Here's the completed barbecue area, with the brickends planted up with aromatic lavender and rosemary - lavender to brush against, rosemary to sprinkle on your steak or chicken breast on the grill. And of course, once you've built a firepit, you have to test it and just *HAVE* to roast marshmallows on it. So here's a quick picture of the crew testing marshmallow and beer combinations at the day's end. 


It's seen a lot of use since, with all ages enjoying marshmallow in various forms of toastyness.....and yes, they had meat on the grill as well. 


Dutch babies


I'm not turning maternal on you, I promise - but I do like making Dutch babies! They are really a misnomer, as the name is derived from the American Pennsylvania Dutch or 'Deutsch' as they should really be - it's a German 'pfannkuchen' recipe that has had some tender loving care in America. It's perfect for breakfast or brunch - and feeds an army of hungry workers in the middle of the day with little preparation & effort. 


In England, we've long had a passion for Toad-in-the-hole and Yorkshire puddings as evening meals or accompaniment with Sunday roast dinners. This is another dish in the same vein - a rich pancake batter which is oven baked in very hot fat at a high heat to puff up into lovely fluffy clouds of crispy deliciousness. The big difference to a Yorkshire pudding - where you add all the toppings in afterwards (onion gravy, sausages) - is the inclusion of the flavour ingredients as part of the batter in the cooking. I take quite an experimental approach to it and add what I have in the fridge but for the less enthusiastic here's some tips : 

Savoury babies :
  • cubes of feta or halloumi
  • bacon or pancetta strips
  • pepperoni slices

Sweet babies :
  • apple slices
  • cherry pieces
  • sugar & lemon

To make the basic Dutch Baby you want :

1/3 cup of all-purpose flour
1/2 cup of milk
2 beaten eggs
salt & pepper to taste ( nutmeg or cinnamon if sweet) 

Mix all the above ingredients into a smooth batter. Preheat the oven to 425 degrees , and prepare a metal tin with small cubes of butter or other fat, sufficient to create a thin layer of oil in the base. Heat the tin in the oven until the fat is lovely & smoking hot. Bring out, and fill with the batter and additional ingredients.  Cook in the oven for 15-20 minutes until the pancake is puffy, goldenbrown and set through. Don't open the oven whilst it's cooking because it will collapse and you will lose all the lovely airspaces that form the crispy edges. 

If you are feeling experimental you can go as far as mix'n'matching in the same time so you have both main and dessert in the oven at the same time  - as in the picture below. You have to be very quick with laying out the ingredients, as you can't mix them into the batter beforehand and you want to make sure the oil/fat layer doesn't lose all it's heat whilst you put the contents in. 


Happy Baby making  & Baby eating. My, that sounds so wrong - and yet so right!

Orchard time - part 1 (getting diggy with it)


The Old Apple Orchard, Wisbech St. Mary
by Michael Shirley


One of the main reasons I chose this house was because I wanted to be able to grow my own fruit and vegetables. I've been a long time reader of sci-fi and fantasy, and in most fantasy novels the protagonist wanders through an orchard and takes refuge sitting in or under an old fruit tree. I love the old orchards you see dotted around both the Dutch and British countryside, with gnarly mature trees spaced out irregularly across a field which is grazed by fluffy cloud-sheep. I tried to get apple trees growing in my old UK home, but never really had either the time or the space to make a genuine orchard. Most trees take up a lot of space and resources in an urban garden unless you aim for mini-varieties, such as 'ballerina' apples, which I did . There is also  growing trend in multi-fruit trees where you can have multiple different varieties grafted on to a single root stock , so can have more options in a smaller space. The lack of space didn't spoil the joy of being able to harvest your own fruit and eat perfectly ripe, perfectly fresh luscious plums and apples during the summer. And it's particularly exciting to be know that the varieties are heritage ones, not something you would be able to purchase in a supermarket or grocers shop. For those of you in the UK, I highly recommend the Brogdale Trust which is the home of the National Fruit collection and sells a wide range of heritage trees.  However, I've always wanted an idyllic grassy orchard to spend a summer afternoon reading in, and the lure of a field I could plant up was far too much to resist. 

As I'm trying to do a lot of the renovation of the house and grounds on a tight budget, I've had to be a lot less picky about varieties, and to focus more on price point in order to find sufficient trees to get the first field started. I've found that Dutch garden centres have mass clearouts of old stock at the end of the autumn season : most people don't want to spend a lot of time in the garden over the winter and it's obviously better to get some money for plants than none. I think I may have gone a little shop-happy with the sale prices! Unusually they are also selling off their tree stock, despite the fact that October - Dec is the best time to plant trees.

With most fruit trees, it's not enough to buy the trees. You need to make sure you can actually get fruit from them.  Hold on to your seats, folks - we are about to go super technical and deep dive into a hidden world of apple tree sex. There's a lot of similarity in other fruit ( pears, plums, cherries ), and in order not to bore you I'm going to stick to apples which is the majority of our stock.

Let's start with genetics! Most apples are 'diploid'  - have two sets of chromosomes. These chaps are the norm in fruit stock. A few are self pollinating (happy chaps!) - can create fruit from their own blossom - but most have to have pollen from compatible partners, and are often picky daters. The key to attaction is all in the timing : early bloomers will pollinate other early bloomers, early-mid will pollinate early mid etc through 4 groups. Although there is some crossover between groups, you are gambling that the season is clement and that the blooms are around at the same time. Some apples though are 'triploid' - three sets of chromosomes. These chaps are essentially mules - sterile. They don't pollinate other trees reliably if at all, but they can be pollinated by other trees. So,good to have for the fruit, but don't count them in your pollination rota.

With the potluck approach to buying trees, having a list of pollinating groups is super important. The Royal Horticultural Society have a useful PDF which you can print or save on a phone or a tablet to take with you when shopping. It's a little limited once you cross out into the EU as suddenly there are lots of varieties which aren't commonly found in the UK. That said, with a bit of extra google help and the assistance of the garden centre staff, I have pollinating partners for most if not all of the trees. Those that are missing will have to be a special order at a later date - but definitely this winter, before it's too late to plant trees.


Planting is simple if  hard work : the soil is fertile, but has large lumps of clay in it. For each tree, we needed to dig a hole that was at least a yard wide in each dimension and boy did people feel that the next day! Then add lots of lovely compost, some fertilizer, the tree itself and bed in with the soil previously dug. A lovely tip from a knowledgeable digger - if you are digging through turf, you can place the turf layer upside down ontop of the tree hole to help keep the non-grassy area clear. The grass will die off, and will act as a supressant, slowing down the regrowth of the grass back into the hole. And  with such young trees, keeping a square of clear land around them is important to give them the best start in life. We staked each tree on the side of the prevailing wind - discovering as we did that the prevailing winds in this part of North Holland are completely un-intuitive and definitely completely different to the UK. to attach the trees to the stake, I am used to rubber tree bands and was surprised to find that the nursey recommended using what looked like safety belt material from car seat belts. I decided to give it a try and it's up and supporting the trees so I won't get the opportunity to see if I can upcycle it from a car scrapyard - but it seems like a clear re-cycling opportunity , rather than buying from new. For the couple of remaining trees still lacking a tie, I will be using the tried and tested route of old laddered tights.

After a couple of weekends of hard work - made much easier by some very kind helpers both times -there is now  the start of a beautiful orchard at the bottom of the garden. W is even starting to look like a young farmer !


Wednesday, 11 November 2015

Toy shopping part 1 : mowers


For the grown up children in the family, the most fun part of the renovation has to be all the wonderful new toys that they get to play with. With 9600 sq metres of grass to mow, a small electric handmower really wasn't going to cut the mustard - and all the renovation work needs tools as well. July saw a massive shopping spree with some very happy gentlemen wandering around hardware shops with more glee than a posse of 10 year olds in a Lego store.


It's been an interesting balancing act : ensuring that the tool is utilitarian & effective, yet at the same time is good value for money, hardwearing enough to stand up to the wear it's going to get, and has enough engineering to reduce some of the hard work out of the equation. 
The first item on the shopping list was the ride on lawn mower : the previous owner had committed to leaving behind her old one, but had changed her mind and sold it pre-d day. We are lucky enough to have a super family store near us that stocks an amazing range of these items : Breider Tuinmachines is one of Noord-Hollands best little companies in my opinion. The store is generally manned by father and son, who are helpful, cheerful and more than willing to advise on options.  We still had to go through a steep learning curve about what's good and what's not good in mowers : 
  • Do you want to mulch or collect your clippings? 
    • Collecting leaves a much neater finish overall and when you have to drive over areas of non-lawn, means you don't end up with needing to brush them down/remove cut grass from pathways.However you do need to constantly run back and forth to the compost heap, unless you choose the same approach as the last owner who randomly dropped the clippings in the weed banks as she drove past. 
    • Mulching puts the grass back into the soil by dint of chopping it very finely, but you are guaranteed to be traipsing grass clippings back into the house for the next day or so - and the animal paws will all be green!
  • Are the blades at the front or in the middle? 
    • At the front gives you much more visibility when cutting and it's much easier to ensure you cut straight lines and maintain your pattern, but the price tag is higher
    • Many lawnmowers are now 'zero turn radius' with big swivel components at the front which allow you to mow much faster and to spin on the spot at corners  - but again, higher in price
    • Middle is cheaper and fine if you are doing long lengths of repeated cutting
    • Does it have reverse? Essential if you have lots of trees and bendy areas to manoever around
    • How quick is it? How powerful? Although you would normally mow at about 4mph (7mph on ztr's) when you are zipping from location to location, you really notice the lack of speed. And if it's slow when mowing and it's a big area.........
    • How hard is it to clean? Because you will need to clean the blades and declogg the grass cuttings from the blade housing. 
    • Can you tell if you are about to run out of fuel? Not that much of a problem for us, as you are never that far away from the house, but if you had a very long plot it might be a worry!
    • How big is your mowing area - and how big is your blade? A small blade can take a mighty long time and it's amazing how much it adds up!

     As it was an unplanned purchase and not in our initial budget structure we decided to opt for a secondhand Husquarna ride-on with a 6 month warranty. It's not been trouble-free, but Mr Breider drops in after he's done in the shop and fixes it promptly every time. With it we also got a set of noise cancelling headphones, something that I'm super grateful for after an hour of boucing around trimming the orchard fields.


    Of course, it's not enough to just use the ride on  - you can't get close to the canal water on the sloping edges and you can't get too close to the flowerbeds for fear of cutting the few remaining flowers. So we also had to get a petrol powered Flymo. It's an entirely different experience than an electric Flymo, and reminds me so much of the hovercrafts that I used to ride between Dover and Calais on day trips. It gently hovers just above the ground whilst belching fumes until it warms up. It's super efficient at cutting grass and building forearm muscles at the same time.

    So, take up gardening, save on gymn fees, get fit! Who knew?

    Tuesday, 10 November 2015

    Finding my 'voice' again

    The hardest thing about picking up blogging again is finding the right 'voice' . It's been the best part of two years, and that little internal chatterstream that sounds just right as your fingers fly over the keyboards sending mental conversation from brain to page has been formalized and structured into succint concise business speak. It's shaking loose again slowly but I still find myself revisiting sentences & word choices. Deciding whether to blog in the 'I' or in the 'we' is a continual challenge as I have wonderful people around me who do so much to make these activities happen together with me, but at the same time - do they really want to be referenced online?

    Gosh, I wonder if I sound in a blog as antiquated as I sometimes think my colleagues think I sound in real life?


    Hobbit eating plants - the extermination of Butterbur


    When you get the keys to a new house in the Netherlands, you have to undertake a walk around accompanied by the departing owner and the estate agent to ensure that nothing has changed since you last saw it in the offer stages. You troop ceremonially to the water meter, the electricity and the gas meter to take note of the readings and the estate agent annotates it on a pre-prepared form and asks you both to sign to agree that the readings are correct. Presumably, this is normally quite an ordinary process - and it is eminently sensible to ensure no unhappiness later on.

    As you can imagine, it wasn't quite that simple here! The mains water stopcock and meter are in a concrete bunker out in the front garden. It's buried deep in a mass of Butterbur (petasites hybridus) which was a small and delicate plant when I first made the offer. By the time all the contracts and legalities were ready to close it had swollen to enormous proportions - a lot like Tolkein's innkeeper in Bree. It was so large that the agent & W had to dive in and hunt for the bunker like Victorian explorers looking for the source of the Nile . With such thick foliage so close to the edge of the canal, the leaves acted as perfect hiding places for swarms of mosquitos all starving during the sunny daylight hours. I react horribly to mosquito bites so clearing this out as quickly as possible rocketed up to the top of the to-do list.

    The garden has been essentially untouched for quite a few years - my best guess is that it's been at least 6-8 years since anyone tried to challenge the Butterbur in it's encroaching growth or the bountiful swathes of nettles that have spread throughout the entire garden area. Our first plan was to cut back the top level , dig out major corms and see if that would hamper the growth of the (at that time) unknown plant. I duly assigned A & M to doing getting out there with the Stihl Kombisystem brush cutter and a fork, shovel and wheelbarrow. 4 hours later, the area cleared was approaching one foot square and the gardening army was exhausted. There had to be another way! That said, plant identification had happened, and I was rapidly realising that I may have a larger problem on my hands than I originally thought. 


    I really didn't want to start using chemicals in my garden, but faced with this challenge, and a very limited time window with large amounts of human resources we finally opted to strim everything back to ground level, wait for the first regrowths and to spray with weedkiller. The picture above is what it looked like 3 weeks after the spraying : virtually no dieback and ever expanding leaves. It had to be the good oldfashioned 'dig it out' way. This plant has the hugest roots - and sends thick meaty runners across the ground and long tendrils deep into the soil. We've been through 4 forks - all with bent tines, already. In desperation, I imported a Spear & Jackson Neverbend Professional fork with a 10 year from the UK in the hope that it might last a little longer than local Dutch brands - it lasted about a week longer, and now I'm looking forwards to seeing how well the guarantee is upheld. 


    After two months of digging we have managed to clear back as much as we dare, without destabilising the banks of the canal, but already the damn thing is growing back despite our best efforts. We went nearly a foot deep and it's still rooting! We will keep digging through the winter, and hopefully in the spring we will be able to re-grass the whole area.

    It's not quite the Hobbiton Green I'm dreaming of yet - but soon, soon!


    Monday, 9 November 2015

    Getting tulip & daffodil ready


    The Dutch are famous for their tulips  - starting as early as 1637 when at the peak of the 'tulip mania' a single bulb would sell for as much as 10 times a craftsman's annual income. In the late spring, It was the first great economic bubble and despite it's subsequent collapse, the Dutch are still master tulip growers. The  Noord-Holland climate is perfect with cool damp springs that brings forth  a living kaleidoscope of color . Driving along the motorways, you pass field after field carpeted in glorious colors. Over the space of about 6-8 weeks from mid March to late April the vista constantly changes as different bulbs burst into bloom. Sadly too, sometimes you see fields where the tulip guillotines have been running - where the farmer has removed the flowers to encourage bulb growth and left the aisles between planting strewn with fading petals. 
                              

    I was house hunting at just that time - and was super excited that the area around the stolpboederij has many tulip farmers. Being able to watch and smell the fragant harvest develop from the house windows is a wonderful treat to come. There are some additional perks as well : lots of farms have buckets with freshly cut tulips for sale next to honesty boxes during the blooming seasons and you can fill your house with flowers in every room for just pennies. In the winter, they often sell the bulbs as well, and I took advantage of another 'too good to say no' deal to buy a bunch of tulip bulbs to go into the garden.  They are a mystery variety, so I have no idea what color they will be - looking forwards to a spring surprise. 
    This autumn week is grey and damp, and it's definitely getting close to late in the season for planting bulbs. I have 150 mixed daffodils to plant as well as my tulips so we decided to focus on getting these all in the ground before continuing with the rest of the garden. The canal bank down the side of the  house is steeply sloping and hard to mow, so it seemed like a great candidate for a bulbfest!

    We started with one traditional style bulb planter and a more advanced one with a 'release' handle that widens out the sides to allow the soil plug to drop out and cover the new bulb. Despite the extra technology, the soil has a high clay content and clings grimly to everything, so it took more time to push the plug back out, than to get it into the planter in the first place. After about 30 or so bulbs, we were both sore wristed and wondering how on earth we would get to the end. Thankfully W had a bright idea and pulled out our recently acquired post hole digging tool - it drilled out the holes super quickly and made in the process crumbled the soil as much as possible given the clay content. An hour and a half later, accompanied by an excited puppy who tried to dig up as fast as we planted, it was all done. The bank doesn't look a lot different - I can't wait for spring!