Thursday 31 December 2015

Happy New Year


It's going to be a quiet evening this year, as W is on night shift over the New Year. I'm hoping he'll send me lots of pictures from his birds eye view of the firework displays that are happening all over the country. Luca's passed his firework training so he should be fine snoozing on the sofa, and Miss Lumikki will curl up on the edge of the bed as always.  For me it's an opportunity to sit down and update those resolutions - which can be made all year round, but have just that much more sticking power on the New Year.

I hope you have a wonderful evening wherever you are, and have a great 2016.


Tuesday 29 December 2015

Fitting new drains and gutterpipe : Holding back the flood part 4


Time to give you an update on the water situation! We've been beavering away in the back ground laying the new drains around the mudroom. In the last update, we'd just finished using a jackhammer to lift the concrete and with Christmas coming, we ended up taking a bit longer than we'd planned to complete the job .Over the next few days, W dug out the channel sufficiently deeply that we could arrange the drains with a downhill flow towards the canal. Once he had them arranged just right - and tested with a few buckets of water flowing through, we lifted and glued the plastic tubes together at the join points. Then, back into the channel, re-measure with a level and re-test with more buckets of water to make sure that we haven't disturbed the underlying soil and set the angles wrong. 


Yesterday we spent the day filling in the edges of the channel with bits of broken concrete and gravel to a level about an inch below the top of the drain. We knew we needed to seal the area with concrete again, but didn't want to have to invest in huge amounts when using some waste material as fill would give just as good a hold. 


Today we filled in and over the edges with concrete : W went first and did the rough fill, then I came along with a fine trowel and did the shaping and edging to ensure that the water drained down into the plastic pipes. I decided to give the finished work a little signature mosaic to add a bit of winter sunshine to the day! Luca tried hard to add his signature paw print to it as well, but we managed to fend him off long enough to complete the task. [update : he managed it - we have two prints for posterity!]


We still need to dig the channel down through the lawn to fit the pipe that runs down to the canal, and we still need to adapt the base of the downpipe from the roof-edge gutters so that it flows into the main grid. Both of the remaining jobs are quite quick and easy, so we will probably get to them tomorrow, once the concrete has had time to set. I'm super happy because already you can see that water drains down and away from house, instead of pooling at the base of the walls , and soaking into the wooden door. We've also stopped the cascade over the edge of the roof gutter and the wall is clearly drying out already. I've had a dehumidifier running in the mudroom for the last few weeks and whilst it would fill in a few short hours when this all started, now it takes a good couple of days before I have to empty the tank - a sure sign that the situation is getting better. 

We've also redone the window frame on the mudroom window, with new hardwood, and lots of industrial grade exterior construction sealant. It looks a lot nicer and the window sill is now dry, so I think we've even managed to stop all the leaks from that location. We may actually finish the year in a dry house!

Monday 28 December 2015

Goodbye, Jesper


Today, we lost one of our family. Just a child, at one year and 3 months. Someone was driving too fast, and didn't see him run out on to the road.


I hope you find many mice where you are now, Jesper.


Saturday 26 December 2015

Having a holiday - Boxing Day


We decided to take a day out of the DIY routine, and spend Boxing Day just chilling.

We took Luca to the beach which he loved - but he wasn't very well behaved and forgot all sense of recall, immediately!

So, beautiful walk, but grumpy Luca because he wanted to run with the wind and couldn't since he had to stay on the leash. And there was a *lot* of wind!

I did find lots of lovely seashells, and managed to fill my pockets with them. Now, I just need to get a spare half hour to do some crafting! Sadly, no driftwood - the North Sea doesn't seem to dump much wood on the Dutch coastline.

Wednesday 23 December 2015

Quick recipes : Cupboard brunch muffins


When we are out working around the house, or running off to work early in the morning it's super useful to have a quick microwaveable snack that you can grab out of the freezer, and eat within 3 minutes. I'm really not a fan of fast food on the whole - so I try to find my own alternatives.  Muffins are super easy to make,  delicious freshly baked, and also freeze quite well!
I'm a big fan of the cupboard muffin - which has a little bit of everything and anything in it, and is perfect for using up little odds and ends in the fridge. Here's a basic recipe you can experiment from yourself :

2 cups of flour
1 cup of milk
1 beaten egg
salt & pepper
2.5 tsp baking powder
.5 cup of grated cheese (a fullfat hard cheese like a Beemster or a cheddar)  
8 slices of bacon, chopped up or equivalent amount of bacon bits.
1 cup mixed vegetables : leeks, broccoli, peppers, carrots


Cook the bacon and place off to the side to cool. Use the lovely bacon flavoured oil to gently fry and soften your mixed vegetables. Mix the egg & milk; mix the flour, salt & pepper & backing powder; then combine the liquids with the flour mix and stir. Add in all the remaining ingredients - I aim for a rich coating of the muffin mix over the contents. Pour into individual muffin tray, ( you can sprinkle a little extra grated cheese on top if you want) and put into a preheated oven at 375 degrees. Cook for 15-20 minutes or until a spike inserted in the muffin comes out clean.

Once the muffins are cool, you can bag them up in a ziplock bag and freeze for later use - if you can resist the yummy smells!

Sunday 20 December 2015

Mounting a flag pole - raising St George's Cross in a strange land.


Here in the Netherlands, so many houses have flag poles. It's not the odd one, or even one in 5 or 10, but nearly every single house. People fly flags all year around celebrating all sorts of different things. On King's day, the Dutch flag is flown proudly, often with an orange wimple. Here in the village, we have a local village flag and it's been flying all this year to celebrate the fact that this village has been here for 650 years ( exciting to know that our home has been here for a fair chunk of that time!). Last year when a missile fired from the Ukraine took down flight MH17 and the news broke - the nation mourned. As the news broke across the country every home had a flag at half mast in the most amazing national unspoken choreography.

Our home is missing a flag pole and it's been on the dream list for a long time. With so many things to get done, we didn't give it very high priority. But as we had to hire a drilling machine to drill holes for the gates, we took the opportunity to drill a meter down into the ground to mount our flagpole. We have very heavy clay, as we found out when digging for the fruit trees, and a meter is a long dig!

It's quite a simple mount : we embedded the base PVC pipe in a concrete mix. We used a dry mix as the ground was sodden from the rains the night before - just tipped a little extra water around to help it. I then spent 5-10 minutes with a leveller and a large tamping stick  alternately checking straightness, then compressing the concrete mix down hard.

A quick spin with the drill to mount the cleat on the side of the pole; threaded the halyard up the pole and  once the concrete had started to take we mounted the pole into the PVC holder.

And here it is : England's flag flies in a small corner of a foreign land. With an ex-RAF chappie alongside it!

Saturday 19 December 2015

Mounting a new post box : curb appeal


With our beautiful new gates, I couldn't leave the old rusted mailbox there. It had huge holes in the bottom that the slugs sneak in through and quietly chew on our post. Whilst it's accepted that the dog ate the homework, people look at you very strangely when you explain that the slugs ate their invoice and you want a new one as a result. I wanted something that was as beautiful as our home is going to be and reflected something of the stature of this amazing farmhouse. I found a great bargain on a Dutch shopping price comparison site, moved quickly and had it shipped over the next day. Its an upright post box that reminds me a great deal of the beautiful red pillar post boxes all over the UK, and is a lovely dark green to match the house. We tried standing it next to the new gates, but it just tilted in an alarming fashion towards the canal. I really don't want to lose my new post box into the murky depths!


We had a lot of off-cuts of wood left over from the gate building and lots of concrete scree from the drain building, so I came up with the idea of building a raised concrete stand for it. The Makita chop saw made easy work of turning 4 poles into stakes. The deWalt cordless screwdriver/drill waltz through screwing 8 panels together to make a lovely mould.

Some broken concrete lumps, some prepared mixed new concrete and we soon had a  fill in place. Remember to tamp down the concrete thoroughly - it makes sure that the gaps are all filled and that there aren't any air bubbles in the concrete. You can level the surface with a concrete trowel. but if you are unsure, using a stick to skim along the edges of the frame works well too. We let the concrete harden and pushed some long iron bolts into it to bolt the post box to it.

As the concrete hardened we decided to keep the wooden frame at a single plank, and had a bit of a quick fix to saw away the extra wood. It also saved on concrete as we'd have had to pour a lot more in! Now the concrete is set, it looks beautiful with the post box set square and centre in it. I still need to do a quick slap of green wood paint to weather proof the wood, and I'm planning a future project to mosaic the concrete surface to include house name and number. I'm thinking of a nice vine or floral/leaf design.....this needs a bit more cogitation I think! But for today - here it is, with me sneaking off to the stables to do a bit more work on window frames in the background......


Wednesday 16 December 2015

Fitting new drains & gutterpipes : Holding back the flood pt 3


We got the quotes in last week for the work we need to do to sort out the water problems at the back of the house. Needless to say, they were quite scary. Just to get a new drain along the back roof edge was over 2000 euros! And that's before we even started to work out how to deal with the rest of the water issues. I think you can guess what we decided to do next then!

We said we thought we could do it ourselves, and as we also had the expert guidance of IDD for a few more days we decided to dive in - how hard could it be? Silly question!

The rear gutter has a single pipe draining down into the sewers. It is in the centre of the gutters which are made of PVC lined wood - and over time they have warped so that the far left collects water and fountains it over the edge instead of pushing it down the  pipe. The drainage pipe itself goes down into very old brick walkway, that's raised above the level of the surrounding concrete. The various ideas suggested by companies were to
- completely replace the gutter so that the new angle ensured drainage towards the center.
- add a new pipe at the left side and dig down through the concrete and grass bank to lay a pipe to the canal. Since it's just rain water, that's fine.
- in addition, we needed to find someway of dealing with the rain pouring off the thatch overhang by the mudroom which was being channeled by the concrete into the mudroom walls. Here as well the suggested route was to dig up the concrete and either add real or french drains.

We decided to go for the second pipe and to dig up the concrete. We hired a concrete slicer (?) and a jackhammer, got together all the pipework we needed, an extra shovel and got going. Step one was drilling out a circular hole in the wood/PVC gutter and using an external silicon glue to fit a connector in. IDD then mounted the rest of the pipe, using pipe rings attached to the wall but held off sealing it together until the drains were ready to be linked to. We have the glue for sealing it, but as we will need it to move around to fit to the ground drain, we will do that last. You can see the green lichen on the wall, from the water flooding over the edges of the gutters.

We then started to slice out our lines and then jackhammer out concrete. OH MY! If ever you wonder why all those workmen have bulging forearms and great muscle definition - try using a jackhammer for an hour or so. It's the most disconcerting, crazy, exhausting thing I've done so far. As we broke through the first surface we realized that this wasn't just concrete - this was steel mesh reinforced concrete with added vavavoom! Luckily W has a metal cutter so we were able to take the surprise in our stride and keep going. After tussling with the jack for a while, I decided to volunteer to be chip-skivy : collecting up all the broken pieces of concrete  and moving them to our dumping ground behind the stables. Frank, our friendly neighbor came wandering by and mentioned that he thought it might take us a while to break it up. Apparently he laid it with his father, back when this was a working farm and they made it strong enough to deal with tractors and lorries and all sorts of machinery. He really wasn't kidding : two days later we finally have the drain areas clear of concrete, but it was dark again and we were so exhausted we decided to continue the project next week. Here's our parting site view, just before final clean up :


It rained cats and dogs during the night on Saturday - and we saw some immediate improvements : now the ground is open, the rain soaks away steadily, rather than standing against the house. Now we just have to get the drains down to help it move more quickly to the canal!

Sunday 13 December 2015

Curb Appeal : building new wooden gates part 3


The gates are up ! It's been a long busy week but I think I can claim that we are (nearly) there. We ran out of the stain, so have a few boards that still need painting, but the gates are up, functioning, and dog proof. I know I should wait until everything is completely done, but.......well, I just have to share because the whole lot is gorgeous!

The boys worked super hard on getting the front gates done over the last three days. The design was quite challenging as I wanted a rose arbour as well as a curved top to the gate, whilst still carrying through the design theme of diamonds.  We used a design pattern from Remodelaholic  for a garden arbor. They designed it for their vegetable garden to grow climbers like cucumbers, but I want it for roses and jasmine.We had to work the sizes a little to fit in the space - we have a canal bridge we have to fit next to.

The first job was to get the frame up. The ground was so soft that the hole drilling was a piece of cake - leaving a lovely layer of basal clay all over the walkway between the road and the house. Of course, when clay is wet, it sticks to your shoes like glue and the whole area turns into a muddy icerink - making life that much harder! It also made it quite hard to keep the fame completely straight and square which lead to some interesting challenges later with the trellis work.

From the frame, the boys turned their attention to the fencing : more poles to go in, and in this case at least one had to go into the canal. To do that, W had to get his neoprene waders on and 'get wet' in December. Luca was really not happy about this situation, so he kept watch from the bank and barked instructions and 'stay safe!' demands. Apparently a few quick lessons were learned : the left side is deeper than the right, but both are quite a drop, so 'jumping in' is not always the best way to get started! I can't say how glad I am that Luca doesn't like water - it makes life so much easier. I keep wondering about teaching him to swim, and then I think about the cost of fencing off the whole property and decide that he can wait a little while longer. He has already tried as a younger puppy, and has no problems getting across and out - he just hates the cold water with a passion.


From there, it was a case of hanging the gate, fitting the ironmongery and mounting the rose trellises. This is the point where they had another nasty shock - because of the soft ground the trellis was square - but the space wasn't! Some quick rework required to make it a better fit.  Once complete, we then rented a concrete cutter and sliced out the concrete posts of the old gate. It was so tired, it collapsed like butter - I'm so glad we got it replaced before Luca tried pushing through it.


Here we go : the final summary!

Inspiration for the front was :


The end result is this :


The main driveway gates inspiration was :


The end result (until we dog proof properly!) is : 


Not bad for first attempt if we say so ourselves! What do you guys think?

Some minor painting,, making a base for the new post box and working out how to dog proof the main gates left to do. I'm thinking of trying to 'float' smaller diamonds in the centre of each of the 4 main diamonds. That should hold back the hound. How would you dog proof the diamonds, and still keep the design  looking pretty?

Wednesday 9 December 2015

Curb Appeal : building new wooden gates part 2


I'm just bubbling with happiness today. The gates project has been a big step for W and I, we are both pretty novice at this renovation stuff and I have been super nervous at times that this whole renovation project has been a bridge too far for us to achieve, and that I've bought a white elephant that's just going to drain money and energy. It's been a life dream, I've always had the belief that  I can really redo and grow an old house into an amazing home. Today has been a real boost to my confidence that we ( read that as W) can do it! For real! Happy pirouettes ......and a reminder that sometimes you have to have the faith to jump into a project with both feet, and trust that even if it's super scary, you will make it to the end and feel awesome. Have faith in yourself, folks - follow your dreams!


Let's start with giving you some before pictures. I realized today that once again, I've forgotten to take great before pictures that show you just how bad things are. We've been rooting around in our photo folders trying to find something and found these images. The plus side is you get to see the driveway in spring, when the bulbs are out and everything looks beautiful just before the trees explode into leaf. The downside is that the distance on the photos just doesn't show you the rust, the way the base is falling off & completely gone from  the main gate , the chicken wire holding the body of the iron pattern together. The front gate looks perfect in this picture, again taken in the spring before we bought the house. What you cant see is that when we cut down the giant hobbit-eating weed (growing up here in the picture) the whole side of the gate collapsed, and that the main gate section is jammed shut with sticks, as the pole has slipped sideways.

My English eyes find gates and fences in the Netherlands a little odd looking as they always end in thin air, over the canal. Logically it makes sense - your common burglar or thief doesn't really want to have to wade through a canal carrying their haul of TV & stereo & computer goods that hate water, so you don't need to fence along the edge of the water. It still looks strange to me, but as the years go by, I get more used to it every day. I wonder if it feels equally odd to other non-Dutchies?

W invested in some tools to make this job viable, and this far into the build I think it's fair to say that both boys are singing their praises. We know that we need to do a lot of carpentry as we build out the upper floors so we took time to do research and buy tools that would go the distance with us. The design of the gates calls for a lot of crisscrossed woodwork and spars being attached. Here's one painted up  drive gate waiting to be mounted. Initially we thought we could do the joining with a kreg jig, but soon realised that the Festool DF 500 Q-Plus GB Domino Joining Machine, 240 V was a better bet. It allows the cutting out of the mortice holes and use 'dominos' - little wooden 'chips' to act as the tenons, for mortice and tenon joins. This means no unsightly screws or holes, just beautiful smooth wood.  He also bought himself a tablesaw  (Festool Table Saw CMS-TS 55 Set ) with various attachments. The combination of the tools has really made the whole project way smoother. I am sure you could use a different saw table, but as I understand it, the Domino Joiner is pretty unique in the market here in NL, there isn't a lot of other manufacturers of similar tools. I have to admit my jaw dropped on the floor at the price of all these tools, but the amazing thing is that it's still seriously cheaper doing it ourselves, than having someone else do the gate build. I have made W promise that I'm going to get lots of wonderful wooden projects done, so I'm already spending time surfing for ideas on Pinterest! We have lots of pallets and scrap wood that was jettisoned around the property and inherited with it that we can work with.

The boys have been working hard since Monday on the gates and have made great progress. IDD continues to be a great mentor and teacher, showing us tricks of the trade and facing each challenge as it comes. Tuesday was focused on finishing off gluing and staining the front gate,  then getting all the wood trimmed and ready for the surrounding fence edges. I wanted to carry the cross pattern through into the fencing, but with a little less complexity so that the gates were still the eye-catchers. We settled on one third of the fence area being a giant St Andrew's cross and having a second rail at the base of the fence to give it height and balance. it has a half length overhanging the water, to make it just a little harder for someone to waltz over - they might actually have to climb! The most important person that I want it to slow down is Luca, the woofer - and he hates swimming so I think it may just work!

Today, the boys worked super hard in getting all the fence post holes dug and started to cement in the posts for mounting the gate and fence across the main driveway. It's been a crazy warm day for December - they've been in t-shirts all day and not felt cold at all.. The main gates  have been hung as darkness crept in, but the light faded so fast, they didn't get all the ironmongery fitted, so the gates are held together with bits of wire overnight. Here's a sneak preview in very bad light of the main drive  - I promise much better 'end result' pictures  in part 3!

I just have to finish with one last picture of my awesome W : his halo is obviously a little slipped to one side in this picture ;) but he's looking super after a day toiling in the garden. So proud of him! And just in case you were wondering where I was - well, I have this little thing called a full time job that means I had to be in the office instead of out here working alongside them. At least I pay the mortgage!


Monday 7 December 2015

Curb Appeal : building new wooden gates part 1


Wow it's been a busy weekend! - So tired I can barely type, and yes, I know it's Monday and not the weekend, I took an extra day. And here's why :

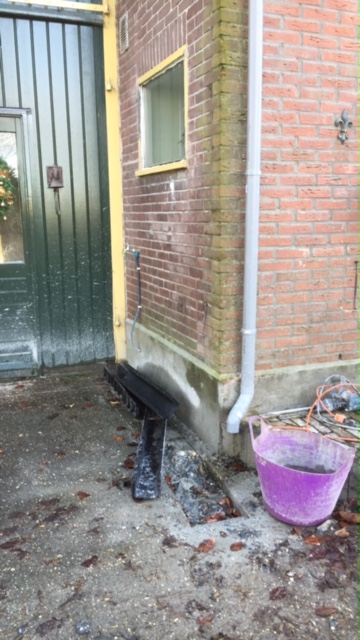
We have two gates - a large double set of farm gates at the main car entrance, and a small single garden gate at the front of the house. Each of the gates is on the edge of the canals that surround the house, and have fences that slope down to the water. They  are  ( were!) cast iron that has seen better days. They have rotted through in so many places that the last owner strapped chicken wire to them to hold them together. That works if your hound is a spaniel, but with Luca now 6 months old and rising, the day he decides to challenge the gates they will collapse in a shower of rusty shards. We had a quote for having new gates made and fitted, but despite being trying very very hard to choose a simple and plain design,  the quote was quite terrifying. W decided it was time to put his skills to the test, and suggested that he would make our new gates - out of wood. Well, you can't turn down an offer like that, can you?

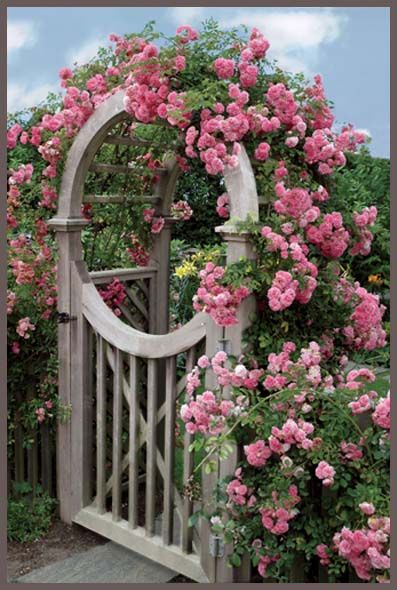
I've been scouting around for designs on Pinterest and found these images :


This main gate is made in a talented woodworking shop in the US, so unlikely that I could get it over here in Holland commercially, without lots of taxes and delivery charges. But I completely loved the style so I tagged the image.

I also loved the idea of having a rose arbor over the front gate - I have a lot of extra climbing roses from our last plant shopping spree and it's been a dream of mine for years and years. These images inspired a look for the front of the house.


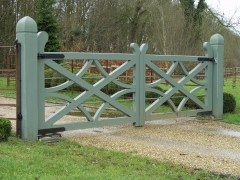
The final piece of the puzzle was for the fencing along the sides  and this picture gave me the last inspiration 


Saturday dawned  and was a rainy and blustery day so we ran around town on a final 'buy everything we need' trip. Of course, it never works out that way, but we made progress in our aspiration of reducing the number of DIY shopping trips whilst executing a project. Sunday has been equally windy and cold so  W & IDD wrapped up warmly and headed out to the stables to get started. I honestly didn't expect a lot of progress on the first day and stuck my nose in around noon to see this : 


The frame of the first gate was up! This was super exciting for me - I have to admit to a tiny little bit of nerves beforehand but seeing this on the table was like an electric jolt of happiness. 


The boys worked through the day and got both the main driveway gates cut and ready for glueing by the end of the day. They glued one, before the light faded so much they had to leave it for the night. 

Here it is in the morning once the glue had had time to set : 


You will notice that the shape isn't quite the same as the one in the picture  : I relented on having curves on the gate since it's W's first big project. And, I am really happy with how it looks anyway - it's much nicer than your normal plain farm gate, that's really only designed to trap sheep and cows, not exploratory Great Danes!

Today, they finished glueing the second main gate and started on the gate for the front entrance. We did some design changes on the fly - I really wanted to carry the diamond theme across so that we would have consistency around the house, and hence more curb appeal. 

They measured and sawed and domino'd and cuss'd a little as the day went and as darkness locked in this is what we have for our front entrance : 


It's a little hard to see from the angle of the picture - they managed to keep a little bit of a curve at the top of the gate to give it a little bit of extra character. It's setting overnight and tomorrow they start on building the trellis and pagoda for the roses to grow over.

I'll leave you with a picture of the boys tucking into a nice cup of hot soup - more to come as the work progresses.