Showing posts with label upcycling. Show all posts

Thursday, 28 April 2016

Restoring a grand old table, part 1

We have inherited the most beautiful picnic table you've ever seen.

It's huge, it's so heavy that four of us can't move it, and it's top is made out of a single complete slice of a very large, very mature tree. You can see the growth rings so clearly, marking every year that this giant stood and watched over the earth.  Sadly, now that it is a table, it has had very little love and care over the last few years, and the top is cracking badly, the edges of the table are crumbling away and there is mould and lichen and rot building up in the crevices.

With all the work that W has been doing with wood, he's been falling more and more in love with the beauty of wood when it's loved and cared for - and this restoration has been high on his priorities. With spring here, and summer barbeques coming, we both really want this baby back at its full beauty.

We spent a lot of time researching how to best rescue it and had advice from many different sources. Many people suggested powerwashing it - but the surface is so broken, we are both quite worried that power washing will degrade it further. It also won't address the way that the surface is flaking in a consistent and gentle way.

We decided to start by sanding it sufficiently to remove the rotten and broken layers, and I will be spending a lot of time clearing out the crevices with a dental pick and a craft knife. W started  on the side that was most rotten and you can see just how much difference it's made already.

After a day of hard work we now have  the top and sides rough sanded. Here it is, halfway through. We still need to do the legs and the base, and I have to get to work clearing out all the crevices .I've started work on it, and I think I will need to use my trusty crafting dremel on some of the larger ones but many are so narrow and deep that we probably won't be able to do much beyond removing surface material. I really want the table to have a chance to dry out before we treat it with oils & wax to stop the rain from damaging it further. We are toying with a plan to put a frame around the table with waterproof covers so that the table can breath and dry out a little before we move  - or maybe we will just pitch a large tent over it. Either way it needs to be easily removable so that it doesn't add to the problem by creating an even moister environment that it sits in over extended periods, and it can be easily shifted on sunny days.

Here she is sanded roughly at the day's end - can't wait to continue! If any of you have done a project of this sort, - restoring old timber like this -  do let us know in the comments of what you think would be the best approach. I want this beauty to last another few decades yet - or longer!

Tuesday, 12 April 2016

Refurbishing a garden table & chair set - and a little more....


 We have a patio in front of the kitchen which is a suntrap in the spring and in the summer. It's lovely to grab coffee and breakfast whilst sitting in the sun watching the ducks and swans gliding around in the canal.  

Last year, we used a very ancient Ikea table, bench and two chairs which have sat out in the garden for the best part of 3 years - and it was pretty clear that they probably wouldn't make it through another winter if we didn't get some maintenance on them.  I bought them when I moved to the Netherlands and had a tiny garden which I kitted out with a cheap and cheerful set of garden furniture. At the time, I really didn't want to spend a lot of money on the garden, and I wasnt thinking for the longer term, so I bought the simplest furniture I could, and decided that if it needed throwing away in handful of years, I'd still have had value from them. The furniture is looking quite shabby now - the majority of the stain has peeled away, a main slat on the bench has broken away, and there is lichen growing all over them. 

With W itching to play with his new Festool sander, and a beautiful sunny spring day, it seemed like fate! First task was to sand down all the surfaces to make sure that there was no loose material that would discolor or disrupt the new coating. Most of the sanding was done with a fairly coarse grain pad - a 60 grit for the majority of the frames, and the table surface was given an extra smooth finish with a graduated sanding up to 120 grit.


A. had previously found some old wood that was a close match to the broken slat,trimmed it to size and attached it in the gap. W sanded the new bar back to make it fit in as much as possible with the original. Then over to me to wield paint brush and wood stain to get everything painted a cheerful rich green - including Luca who developed green zebra stripes due to incautious inquisitiveness. We ran out of paint half way through, so we had to do a quick run to the DIY store to get a top up.


A few hours drying in the sun and we have once again a lovely table & chairs set on the patio outside the kitchen to have breakfast in the sun. Here they are, ready to sit at and watch the world go by.


Looking forwards to the next weekend!


This weekend, though, I got into a bit of overdrive mode and decided to keep going with the sanding and painting. The side window in the stables has peeling paint - and the wooden frame is getting exposed to the elements. The new sander zipped through the task in no time at all, and I spent the dying light hour of the evening getting the first coat of paint over the newly prepared surface.

 I still need to do another coat so I haven't got a done photo yet, I'll update this page when complete.


Monday, 4 January 2016

Renovating a chair : from cane to cushion without damaging an antique


A few days ago we found the most charming set of 6 hardwood chairs advertised for sale on a classifieds site here in the Netherlands (Marktplaats). It's the Dutch Craig's List & eBay rolled into one and if you search carefully you can find some amazing gems. This was one such gem :  when we went to see the chairs, the owners told us they had purchased them in an antique store in Belgium , that they were pre-1900, and hardwood, but that they need to get rid of them because they were broken. The seats are rattan, and the rattan has frayed and broken on 3 of the 6 chairs - but the actual wooden frame is solid and undamaged. Needless to say, I swooped and took them there and then!

First thing to do on getting them home was to gently clean the wood with a wood cleaning soap & damp cloth. For the carving using an old frayed toothbrush was enough to get into the corners you can't normally reach and that gather a layer of dust so solid that it looks like part of the chair. Once the chairs had dried thoroughly, I polished them gently with a no-silicon, bees wax polish. Be careful with furniture polishes from supermarkets - many have silicon in them to get the high gloss effect, but it can cause a horrible white bloom on the wood as a result

Next task was to unpick the cane from the most damaged seat. I had to remove the seat top level as the frame covered the cane weaving holes at the front. I used a Gerber pocket knife and a pair of tweezers to pick the bits out of the holes. You can see in the image that this was a hand woven seat, as it has holes drilled all around the front of the seat. A lot of modern rattan seats are made with a prewoven mat which is pushed into a deep grove around the edge of the chair and then covered with a final cane runner that is glued in to hold the seat in place.  Knowing the age of the chair, I didn't want to damage the chair as part of my renovation - but I really did want to turn the seat into a padded cushion, rather than re-weaving it myself. (Something I might do at a later date, but just not today, far too much on the list already!).

I traced the shape of the indented area on the top frame, and used it to mark out cutting lines for a base on  a piece of 1/2" thick plywood. W kindly cut the plywood out to the marked shape for me - a task of mere minutes for such an experienced wood worker. Once the wood was carved, I used it as the template for drawing around for the thick foam that would form the majority of the seat padding. I then carved it to shape. I think it was a bit scrappier than I would have liked, but apparently all my crafting knives have been used in DIY and the blades were all quite tired and blunt. The foam is really deep :  I particularly wanted a more padded seat than normal - the chairs are just a little bit lower than modern dining chairs. Fun initially as it gives a real Goldilocks sensation sitting at table, but ultimately, not the most comfortable seating. The extra padding is just enough to lift you up to normal height - and no-one ever complained about nice soft seats! 

I also bought a thinner foam as I'd seen a number of sites recommending multiple layers to give more comfort, as well as a final layer of quilt wadding. I cut that a little larger than the base - sufficient to cover the foam and over onto the base by about an inch or so. The fabric was cut another few inches larger to make sure it covered over the foam layers. In the end, I decided that the quilting fabric was overkill - the cushion was already pretty padded and stands up high above the seat.  It took a while to decide which way around to have the fabric - the seat is wider at the front than at the back and the fabric has text on it. In the end I decided to have the text facing you as you look at the seat from in front of it, rather than from behind. 
I positioned the fabric carefully to get the best balance of flowers then laid out the layers - cloth, thin foam, fat foam, wood. I stapled the first two layers (fat foam, covered by thin foam) first. Starting at the middle at the front I put an inital 3 staples in, then stretched the foam over the back to compress the edges into a delicate curve. Same again for each of the sides, making sure to stretch the thin foam smooth, then on to the corners. I don't have any magic tips here - I read lots of articles about how to make single pleats, butterfly corners and far more, but when it came down to it,  I ended up with trial and error attempts to get the least number of pleats, and tidiest looking pleats I could achieve. Lots of staples, and trimming of the excess later and it looked quite reasonable! 
Next was fitting the fabric layer which was basically the same, I opted to make it a bit deeper, so that I could fold the edges under, and ensure that I'd hidden the foam. I believe professionals use a base cover to mask the imperfections : as this is for me, and my home, I was less worried! The corners were even harder to get smooth and simple and the underneath is definitely not the worlds most elegant upholstery work. I trimmed a lot of excess fabric off : lesson for next chair is that I really don't need to leave so much 'just in case' fabric - it just needs to be trimmed when it's all awkward angles and corners.

 Lastly, W has attached four small wooden cubes to the plywood base, one in each interior corner of the seat frame that hold the seat in place without wobbling in the frame. I have decided not to glue it, so the seat will fall out if the chair is tipped upside down, but for all practical purposes, the seat is secure and solid. It doesn't harm the body of the chair, and it means that if I decide I want to go to rattan at a later date, it's a painless step back, just lifting out the padded cushion. One down, 5 to go. That said, I've decided to only do the two badly damaged ones initially, and to see how it goes with the remaining 4. I think the 3rd with damage will need redoing quite soon but the rest act as a comparison between the padded seat & the original design idea. Here it is, in the dining room ready for use!


Saturday, 2 January 2016

How to save money whilst doing a renovation


I've been working hard over the last few days - although it's all quite invisible!

One of the big commitments I made to myself with this house is that I would try and save as much as I could on costs, and help the environment at the same time by upcycling and re-using things that other people want to get rid of. It's fun to go treasure digging in second hand stores and there are many websites that are used by folks to move on their no longer needed items in an easy, eco-friendly way.It's great to know I've saved something from adding to the growing landfill mountain. Here in the Netherlands, I'm an avid user of Marktplaats.nl, and in the UK I used Gumtree & eBay pretty frequently. [Disclosure : I am an eBay employee, however these are my personal opinions - I work there because I *like* what they offer to people]. Facebook groups are interesting to browse, but I find that if you don't spend inordinate amounts of time glued to your electronic device, it's pretty impossible to find listed items you want - very hit and miss at the moment. Salvage yards, charity shops, 'kringloopwinkels' here in the Netherlands, and carboot sales are all grist to the mill.

And of course, the carboot sale to end all carboot sales is coming up again in a few months : King's Day! To celebrate the King's birthday, the Dutch turn out en masse as a nation to sell and buy secondhand goods from every available piece of pavement space, wearing lovely joyous Dutch orange colors and relax with friends and family.

Whilst all these ways are wonderful fun, to take the most advantage of them, it's vital to have a comprehensive 'I want' list. Items come up at random, so you have to be able to grab them well in advance of the date you need to have them. You can't guarantee to find stuff on the day you need it, and that usually means full price shopping as a result.

So the last few days we've been planning out what we want to achieve in 2016 and what we will need to do it. The list is really quite scary ( Evernote is my friend, again  - easy to share between W and myself) - growing every day, and easily over a hundred items already, with bold statements like 'build a shed' & 'repair the barn' amongst them!  Pinterest has been browsed extensively to get inspiration and ideas , and we've been starting to drill down into the item level detail  'we need 30 feet of coving' . Whilst it seems frustrating and a bit of waste of time when you could be out in the garden playing with plants or wielding a power tool, actually planning out what you need, and making sure it's on hand saves loads of time and frustration when it actually comes to 'doing time'.

We've also been checking out the January sales - not as extensive as they are in the UK or the US, but present nonetheless. If we can get something we need now, at half price, rather than in 4-6 months it feels like a good bargain. But of course, remember - it's not a bargain if you don't really need it and it just collects dust and adds to your collection of 'stuff that never gets touched'.

Lastly we've started to watch auctions - sometimes great value when you see the entire stocks of companies that have gone bankrupt being auctioned off for pennies. I just missed a lovely set of travertine tiles for an absolute steal - but as I hadn't measured up and wasn't willing to gamble on such a large expensive purchase, I'll just have to find it again another time.

I've also been starting to hunt for items - and researching how to do new DIY work that we haven't done before. It's made more complex in that I need to research it in English (my Dutch is quite terrible), ask W what the Dutch translation of a highly technical term is, only to discover that he doesn't know the English, and then spend an hour or more with lots of dictionaries before I can start to hunt for the goodies!

We've started to see results already - we knew we wanted some new dining room chairs and up came a lovely set of  6 pre-1900 Belgian carved hardwood chairs that were being got rid of because the rattan seats were falling apart and the owners didn't want to repair them. Instead, they just wanted to get rid, and would probably have sent them to the tip if they hadn't been taken.  At 60 euros for the chairs and about another 20  more for some on sale fabric, some foam, and some plywood we have the makings of a lovely new dining room set!

How do you find your upcycling gems?

Sunday, 13 December 2015

Curb Appeal : building new wooden gates part 3


The gates are up ! It's been a long busy week but I think I can claim that we are (nearly) there. We ran out of the stain, so have a few boards that still need painting, but the gates are up, functioning, and dog proof. I know I should wait until everything is completely done, but.......well, I just have to share because the whole lot is gorgeous!

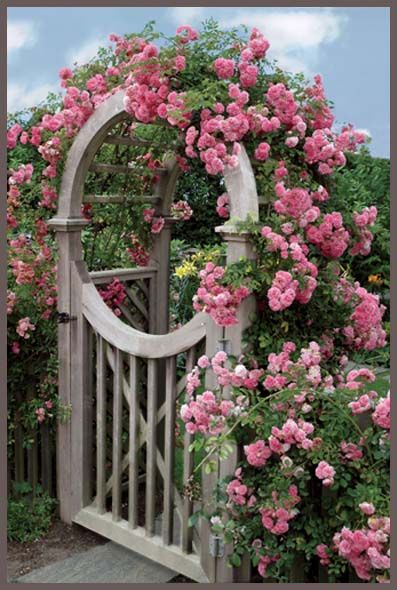
The boys worked super hard on getting the front gates done over the last three days. The design was quite challenging as I wanted a rose arbour as well as a curved top to the gate, whilst still carrying through the design theme of diamonds.  We used a design pattern from Remodelaholic  for a garden arbor. They designed it for their vegetable garden to grow climbers like cucumbers, but I want it for roses and jasmine.We had to work the sizes a little to fit in the space - we have a canal bridge we have to fit next to.

The first job was to get the frame up. The ground was so soft that the hole drilling was a piece of cake - leaving a lovely layer of basal clay all over the walkway between the road and the house. Of course, when clay is wet, it sticks to your shoes like glue and the whole area turns into a muddy icerink - making life that much harder! It also made it quite hard to keep the fame completely straight and square which lead to some interesting challenges later with the trellis work.

From the frame, the boys turned their attention to the fencing : more poles to go in, and in this case at least one had to go into the canal. To do that, W had to get his neoprene waders on and 'get wet' in December. Luca was really not happy about this situation, so he kept watch from the bank and barked instructions and 'stay safe!' demands. Apparently a few quick lessons were learned : the left side is deeper than the right, but both are quite a drop, so 'jumping in' is not always the best way to get started! I can't say how glad I am that Luca doesn't like water - it makes life so much easier. I keep wondering about teaching him to swim, and then I think about the cost of fencing off the whole property and decide that he can wait a little while longer. He has already tried as a younger puppy, and has no problems getting across and out - he just hates the cold water with a passion.


From there, it was a case of hanging the gate, fitting the ironmongery and mounting the rose trellises. This is the point where they had another nasty shock - because of the soft ground the trellis was square - but the space wasn't! Some quick rework required to make it a better fit.  Once complete, we then rented a concrete cutter and sliced out the concrete posts of the old gate. It was so tired, it collapsed like butter - I'm so glad we got it replaced before Luca tried pushing through it.


Here we go : the final summary!

Inspiration for the front was :


The end result is this :


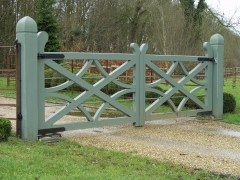
The main driveway gates inspiration was :


The end result (until we dog proof properly!) is : 


Not bad for first attempt if we say so ourselves! What do you guys think?

Some minor painting,, making a base for the new post box and working out how to dog proof the main gates left to do. I'm thinking of trying to 'float' smaller diamonds in the centre of each of the 4 main diamonds. That should hold back the hound. How would you dog proof the diamonds, and still keep the design  looking pretty?

Wednesday, 9 December 2015

Curb Appeal : building new wooden gates part 2


I'm just bubbling with happiness today. The gates project has been a big step for W and I, we are both pretty novice at this renovation stuff and I have been super nervous at times that this whole renovation project has been a bridge too far for us to achieve, and that I've bought a white elephant that's just going to drain money and energy. It's been a life dream, I've always had the belief that  I can really redo and grow an old house into an amazing home. Today has been a real boost to my confidence that we ( read that as W) can do it! For real! Happy pirouettes ......and a reminder that sometimes you have to have the faith to jump into a project with both feet, and trust that even if it's super scary, you will make it to the end and feel awesome. Have faith in yourself, folks - follow your dreams!


Let's start with giving you some before pictures. I realized today that once again, I've forgotten to take great before pictures that show you just how bad things are. We've been rooting around in our photo folders trying to find something and found these images. The plus side is you get to see the driveway in spring, when the bulbs are out and everything looks beautiful just before the trees explode into leaf. The downside is that the distance on the photos just doesn't show you the rust, the way the base is falling off & completely gone from  the main gate , the chicken wire holding the body of the iron pattern together. The front gate looks perfect in this picture, again taken in the spring before we bought the house. What you cant see is that when we cut down the giant hobbit-eating weed (growing up here in the picture) the whole side of the gate collapsed, and that the main gate section is jammed shut with sticks, as the pole has slipped sideways.

My English eyes find gates and fences in the Netherlands a little odd looking as they always end in thin air, over the canal. Logically it makes sense - your common burglar or thief doesn't really want to have to wade through a canal carrying their haul of TV & stereo & computer goods that hate water, so you don't need to fence along the edge of the water. It still looks strange to me, but as the years go by, I get more used to it every day. I wonder if it feels equally odd to other non-Dutchies?

W invested in some tools to make this job viable, and this far into the build I think it's fair to say that both boys are singing their praises. We know that we need to do a lot of carpentry as we build out the upper floors so we took time to do research and buy tools that would go the distance with us. The design of the gates calls for a lot of crisscrossed woodwork and spars being attached. Here's one painted up  drive gate waiting to be mounted. Initially we thought we could do the joining with a kreg jig, but soon realised that the Festool DF 500 Q-Plus GB Domino Joining Machine, 240 V was a better bet. It allows the cutting out of the mortice holes and use 'dominos' - little wooden 'chips' to act as the tenons, for mortice and tenon joins. This means no unsightly screws or holes, just beautiful smooth wood.  He also bought himself a tablesaw  (Festool Table Saw CMS-TS 55 Set ) with various attachments. The combination of the tools has really made the whole project way smoother. I am sure you could use a different saw table, but as I understand it, the Domino Joiner is pretty unique in the market here in NL, there isn't a lot of other manufacturers of similar tools. I have to admit my jaw dropped on the floor at the price of all these tools, but the amazing thing is that it's still seriously cheaper doing it ourselves, than having someone else do the gate build. I have made W promise that I'm going to get lots of wonderful wooden projects done, so I'm already spending time surfing for ideas on Pinterest! We have lots of pallets and scrap wood that was jettisoned around the property and inherited with it that we can work with.

The boys have been working hard since Monday on the gates and have made great progress. IDD continues to be a great mentor and teacher, showing us tricks of the trade and facing each challenge as it comes. Tuesday was focused on finishing off gluing and staining the front gate,  then getting all the wood trimmed and ready for the surrounding fence edges. I wanted to carry the cross pattern through into the fencing, but with a little less complexity so that the gates were still the eye-catchers. We settled on one third of the fence area being a giant St Andrew's cross and having a second rail at the base of the fence to give it height and balance. it has a half length overhanging the water, to make it just a little harder for someone to waltz over - they might actually have to climb! The most important person that I want it to slow down is Luca, the woofer - and he hates swimming so I think it may just work!

Today, the boys worked super hard in getting all the fence post holes dug and started to cement in the posts for mounting the gate and fence across the main driveway. It's been a crazy warm day for December - they've been in t-shirts all day and not felt cold at all.. The main gates  have been hung as darkness crept in, but the light faded so fast, they didn't get all the ironmongery fitted, so the gates are held together with bits of wire overnight. Here's a sneak preview in very bad light of the main drive  - I promise much better 'end result' pictures  in part 3!

I just have to finish with one last picture of my awesome W : his halo is obviously a little slipped to one side in this picture ;) but he's looking super after a day toiling in the garden. So proud of him! And just in case you were wondering where I was - well, I have this little thing called a full time job that means I had to be in the office instead of out here working alongside them. At least I pay the mortgage!


Monday, 7 December 2015

Curb Appeal : building new wooden gates part 1


Wow it's been a busy weekend! - So tired I can barely type, and yes, I know it's Monday and not the weekend, I took an extra day. And here's why :

We have two gates - a large double set of farm gates at the main car entrance, and a small single garden gate at the front of the house. Each of the gates is on the edge of the canals that surround the house, and have fences that slope down to the water. They  are  ( were!) cast iron that has seen better days. They have rotted through in so many places that the last owner strapped chicken wire to them to hold them together. That works if your hound is a spaniel, but with Luca now 6 months old and rising, the day he decides to challenge the gates they will collapse in a shower of rusty shards. We had a quote for having new gates made and fitted, but despite being trying very very hard to choose a simple and plain design,  the quote was quite terrifying. W decided it was time to put his skills to the test, and suggested that he would make our new gates - out of wood. Well, you can't turn down an offer like that, can you?

I've been scouting around for designs on Pinterest and found these images :


This main gate is made in a talented woodworking shop in the US, so unlikely that I could get it over here in Holland commercially, without lots of taxes and delivery charges. But I completely loved the style so I tagged the image.

I also loved the idea of having a rose arbor over the front gate - I have a lot of extra climbing roses from our last plant shopping spree and it's been a dream of mine for years and years. These images inspired a look for the front of the house.


The final piece of the puzzle was for the fencing along the sides  and this picture gave me the last inspiration 


Saturday dawned  and was a rainy and blustery day so we ran around town on a final 'buy everything we need' trip. Of course, it never works out that way, but we made progress in our aspiration of reducing the number of DIY shopping trips whilst executing a project. Sunday has been equally windy and cold so  W & IDD wrapped up warmly and headed out to the stables to get started. I honestly didn't expect a lot of progress on the first day and stuck my nose in around noon to see this : 


The frame of the first gate was up! This was super exciting for me - I have to admit to a tiny little bit of nerves beforehand but seeing this on the table was like an electric jolt of happiness. 


The boys worked through the day and got both the main driveway gates cut and ready for glueing by the end of the day. They glued one, before the light faded so much they had to leave it for the night. 

Here it is in the morning once the glue had had time to set : 


You will notice that the shape isn't quite the same as the one in the picture  : I relented on having curves on the gate since it's W's first big project. And, I am really happy with how it looks anyway - it's much nicer than your normal plain farm gate, that's really only designed to trap sheep and cows, not exploratory Great Danes!

Today, they finished glueing the second main gate and started on the gate for the front entrance. We did some design changes on the fly - I really wanted to carry the diamond theme across so that we would have consistency around the house, and hence more curb appeal. 

They measured and sawed and domino'd and cuss'd a little as the day went and as darkness locked in this is what we have for our front entrance : 


It's a little hard to see from the angle of the picture - they managed to keep a little bit of a curve at the top of the gate to give it a little bit of extra character. It's setting overnight and tomorrow they start on building the trellis and pagoda for the roses to grow over.

I'll leave you with a picture of the boys tucking into a nice cup of hot soup - more to come as the work progresses.