
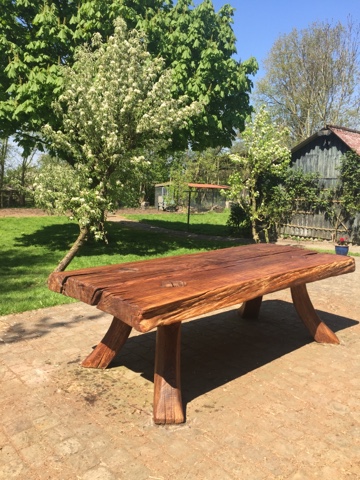
Our beautiful table is done!

 W has spent lots and lots of hours working on her. After the rough sanding we covered in the last blog, he focused on the legs as the easiest place to get a solid sanding routine going. Starting with a 40 grit, then working his way through 60, 80, 120, 180 grit and finishing with a delicate polish on 320 grit. The legs came up magically smooth and incredibly tactile as a result. Working on the underside was hard and dusty work - I'm still not sure how he managed to wear all that safety gear and still work in the blazing sun and heat we've just had. That said, it's a remarkably good idea to have the face mask as there was a lot of dust flying around. He has repeated the process on the main table top surface and she is just glorious.

We've coated her with 3 coats of Danish oil - the first cut with turpentine oil to carry the oils deep into the surface. She drank the first coat in like a lost man coming to a bar in the middle of the desert - we went through more than 3 times as much oil on the first coat than on any other coat. It's sticky horrible work, and it's impossible to get Danish oil off your skin - but it was worth every minute we had to spend in the shower sanding it off ourselves with crazy amounts of scrubs. It is almost impossible to capture the way the table glows in the sunlight - she looks beautiful in the pictures, and is so much better in real life.

It looks gorgeous!
ReplyDeleteThanks for sharing these ideas about using marble in interior design.
ReplyDeletehome renovation Ireland
kitchen renovation Dublin
bathroom renovation contractors Ireland
house renovation services
renovation ideas for Irish homes
eco-friendly renovation Ireland
old house renovation Dublin
renovation cost estimator Ireland
modern home renovation trends
renovation contractors near me Ireland
Thanks for sharing these ideas about using marble in interior design. home renovation Switzerland
ReplyDeletekitchen renovation Zurich
luxury villa renovation
bathroom remodeling Geneva
Swiss renovation experts
energy-efficient renovatio
Thanks for sharing these ideas about using marble in interior design.energy-efficient upgrades
ReplyDeleteVienna renovation projects
sustainable building practices
historic building restoration
Austrian architecture trends
deep renovation strategies
eco-friendly materials
residential refurbishment Austria
green renovation funding
interior design Austria