Monday, 30 November 2015
Dutch pea soup - Rae's way.
Winter's here, and the temperature is dropping. We've had frost on the cars, and the constant rain and storms is a dead giveaway that we are well into the cold season. I love the comfort of a large bowl of steaming thick soup and the Dutch have their own national speciality that fits the bill perfectly. It's called 'snert' or 'erwtensoep' and is a thick pea soup that is absolutely perfect for winter weather. It also freezes very easily and is great for microwaving for lunch at the office - something that is incredibly useful for me, since I find I'm usually starving 5 minutes after the usual Dutch cheese sandwich.
So let's kick on to Rae's Dutch pea soup :
2 large onions, chopped coarsely
1 large leek
1 celeriac
3 potatoes
2 carrots
2 celery sticks
2 rosemary sprigs
1 smoked sausage
200g of bacon bits
2 fatty pork shoulder steaks, bone in ( or more if you want a more meaty soup)
500g of dried peas or split peas.
salt & pepper to taste
The traditional smoked sausage used in the Netherlands is 'Gelderse Rookwust' from the province of Gelderland. It's tied in a loop and is very smooth in texture. If you can't find a good quality smoked sausage you could replace it with frankenfurters or something similar.
It makes life so much easier in the kitchen if you do the majority of the preparation before you start cooking - at least enough that you have a sense of 'flow' rather than a start stop feeling. I start with the preparation of the vegetables : all peeled & coarsely chopped in chunks. The celeriac is a really important vegetable in this soup - it brings a depth of flavour that would be otherwise lacking Then the meat needs to be diced and the onions chopped into chunks . Keep the bone pieces, they add flavour and can be picked out at the end.
I soften the onions in olive oil until they start to look a touch translucent, then in goes the chopped pork steaks and the bacon bits. Hold on to the sausage, don't add that just yet. Once you've tumbled the meat once or twice in the hot oil and onion mixture, add the peas,and bring it to the boil for a couple of minutes. Skim the top, then add the chopped vegetables and water to cover. I add 2 rosemary sprigs at this time to give just that extra little flavour. You can also add a stock cube if you are concerned that the flavour isn't rich enough. Bring it to the boil and turn it down to a beautiful slow simmer for about 1.5 - 2 hours until the vegetable and peas are melting into a beautiful soft mush. Check at half time and season to taste with the salt and pepper.
When the soup gets close to mushy and thick, keep a close eye on it - this is the time it's most likely to 'catch' and burn on the base of the pan. Add the sliced smoked sausage in the last half hour and stir in gently. Serve it with fresh bread chunks slathered with butter.
I always make far far too much ( these quantities will serve a large family, and have leftovers) and then I cool it in freezer boxes for taking to work or for a quick easy dinner.
Eet smakelijk! as the Dutch would say. Bon Appetit!
Sunday, 29 November 2015
Plans, plans, plans!
Super excited !
We got post this week that had me jumping all over the scenery with happiness. About three weeks ago we had the architects in to measure up the house, as a preliminary for making plans for the major renovations.
They've finally sent back the 3 D diagrams of the house - with the main frame accurately mapped out which is fundamental to deciding how to build the rest around it. In addition to the actual plans they have also created some 3D diagrams that show exactly what the house looks like now :
The front or BDM (births, deaths & marriages) door as we call it, is on the side of the house opening onto a small hallway.To the left is the kitchen and to the right is the mudroom, The kitchen has a lovely patio door and we love sitting out in the sun for breakfast on summer days. Past the kitchen is the living room with the conservatory jutting out into the garden. Our neighbour Frank was born in this his house, and he told us that the conservatory was built for his grandfather - who was farming cows here and broke his hip, causing him to be bedridden for in excess of 6 months, so that he could watch the world going by. To make sure the cows were properly looked after, he apparently asked his sons to drive the cattle past so he could see how well they were doing.
The back of the house has our favourite room the craft/computer room. That said - we've not actually done much on the computers, beyond link them up. Well - one of them. Mine still isn't cabled and I really should get around to it some time soon! It looks out towards the stables and down towards the fields. I don't think we will be able to see the fruit trees in blossom sadly, as they are behind the stables.
Here's the last view - and it's one of my favourites. As you can see, we still have the old barn doors leading into the mudroom. It's part of the character of the house and makes me happy every time I see them. W has always had a hankering to be farmer, and this is a reminder that dreams can come true!
The last picture that I want to share is of the 'vierkant' - the four post frame in the centre of the building : I tried really hard to describe the construction in an earlier post and hopefully this will make everything clear! Its quite fascinating to see the bones of your home in such graphic detail - here's to it remaining strong for another few hundred years.
We've been running around all summer doing stuff that was supposed to be just getting us into the house as 'liveable' - this is the starting blocks of the transformation!
Holding back the flood - part II
What a week!
We have had one success : the field drain is working nicely and the fruit trees are no longer standing in their own personal swimming pools. It's still pretty damp out there, but hey, this is Holland. It rains. And there is water. Lots and lots of water.
We've had chaps out to estimate for all sorts of work : we need to replace the gutters along the rear of the house, dig out the concrete around the mudroom entrance and lay drainage, get damp coursing injected into the base of the house to stop the rising damp, and we still haven't managed to work out why we have no electricity running through the top of the house. I'm hoping for a visit from the electrician tomorrow otherwise there's a good chance that our visitor at the end of the week will be wandering around in the dark at night.
Put all of this on top of the fact that it's been madly busy at work with a couple of late nights in the office, and I've been sadly lax in blogging. Most nights have been a case of get home, collapse into bed, and sleep. It has made me think about frequency of blogging. I know it's a key measure of success for a blogger - can you keep up a consistent stream of information for your readers? I'm planning to aim for 2-3 times a week - and if there is more, it's a bonus. I'll try and get something every weekend and once or twice during the week.
So, still paddling in water, but slowly making progress out of the flood!
Tuesday, 24 November 2015
Holding back the flood - part I
Life in a Dutch farmhouse definitely seems to consist of spending a lot of time battling water - and the knock on effects of too much water.
Earlier in September, after a lovely dry summer, we had more rain in the space of 4 days than we normally have in the whole month, even here in North Holland. Within a few hours we started to see water running into the living room through the ceiling and racing upstairs saw water pouring across the bedroom floor. We spent the evening dancing in the rain on the conservatory roof, unplugging gutters and drains, bailing water that was pouring down the thatch onto the flat roof. It slowed the flood - but didn't cure the issue completely. We thought we'd identified the issue as being the old flat roof on the living room conservatory, so we called out a roofer to replace it. The next day W went climbing about in the attic to look for any other traces - and sure enough, there was another large pool of water - so we called out the thatcher to have new thatching above the windows. I was so relieved - we thought we had resolved the issue.
Until about 4 weeks later, when again, we had water running across the floor - this time from a leaking pipe on the radiator. Ok, not so bad, simply call out the plumber to have a look and get new pipes in to replace the old worn ones, because we didn't have the time to do it ourselves. I don't mind learning on the job as we do DIY and have the time to do it , but learning whilst there is a continuous flow of water across the floor, no hot water, and the boiler is on the blink - and we have to be in the office, isn't my favourite.
As the rains deepened, we realised that the gutters across the back of the house are not tilting properly, causing water to run down the brick walls, and soak into the plaster - it's still an ongoing issue. And yesterday, we realised that the plaster in another room is soaking wet ( and now has not-so-pretty newspaper print all over it!). I think we have rising damp in that room - and W & I have jumped another hurdle - how to explain rising damp to each other when you don't share a common language in DIY jargon!
This weekend was the fields being flooded and I covered that in an earlier post. Today we've lost the electrics in the living room and the kitchen - shorting in the rain. I think the next few days will see a lot of running around to and sort this all out! I've entitled this part I, in the hope that I can soon publish part II which is all happiness as we've turned back the water still currently encroaching on our home.
Monday, 23 November 2015
Kale chips - savoury heaven
I've always had a passion for savoury, far more than sweet flavours. Here in the Netherlands, I find I really miss English junk food - salt & vinegar or roast beef flavoured crisps are just so much more addictive than caramel waffles or chocolate. And neither paprika flavour or plain salted crisps hold a candle to the rich flavours I miss. And whilst junk food isn't too healthy , it is quite addictive.
Kale chips are my answer to that craving - and they are just awesomely tasty! They are also incredibly easy to make.
Grab yourself some kale next time you are out shopping for food. I tend to use packets of ready sliced and washed because it's quick and easy - but it's simple enough to slice the kale leaves into fine shreds. I'm looking forwards to next year when the vegetable garden is growing well, and I can pop out and grab my kale fresh from the garden. You then need to coat the leaves with a film of olive oil. This is simultaneously the easiest and hardest part. You don't want to drown the leaves in oil, but do want to ensure that they are thoroughly coated. So, add a small slug of oil to the leaves in a bowl, and get in there with clean hands and massage the oil all over them. It's great for ensuring they are evenly coated and also gives you silky smooth moisturized hands as an added bonus.
Pre-heat the oven to 180 degree centigrade whilst you spread the leaves out thinly on a shallow baking tray. Sprinkle over with salt and pop into the oven to crisp up. I struggle to get the timing perfect when I measure by the clock - somewhere between 10 -15 minutes. I find it best to keep a close eye on it, and ensure to whip them out as they start to go crispy, and just the first tips go dark.
I love using kale chips as flavouring and toppings on dinner dishes. They are wonderful sprinkled on thai green curry, or macaroni cheese. They are wonderful to roll cheese fondu dipped bread chunks in for that extra little zing on your fondue bite. Give them a try and tell me what you serve them with !
Saturday, 21 November 2015
Land below the sea - waking to the flood
One of the facts of life when you live in the Netherlands is that unless you are lucky, you live below sea level. When 2/3rds of the country is recovered from the sea, it's kind of a given. Where we are, the land started to be recovered in the 17th century with windmills lifting water from polder to polder - so it has matured and grown a broad eco-system. In some of the areas around the Ijsselmere, which were recovered as late as the 1980s, the plant variety is still surprisingly low and there is a real dearth of mature trees. The water has been removed, but it still has to be continuously cleared out and the Dutch have built the most comprehensive system of interconnected ditches and dykes you have ever seen. As a land owner whose land abutts a drainage ditch, by law I have to have it dredged and cleared every year unless I build solid shoring along the edges of the land.
It's been raining. Quite a lot, in fact. Yesterday, the riding ring had standing water in the sand - this morning we woke to flooded fields . With a set of cold frosty nights approaching the last thing I wanted was the newly planted fruit trees to be sat in a pool of icy water and have frostbitten roots. I want that orchard, and it needs roots to be able to grow! As so often in this house, an emergency task rises to the top of the list and everything else has to go on the back burner until the situation is resolved. We pulled on our yard boots, prayed they were waterproof enough and headed out to the fields with poles, a drain cleaner, and a spade.
W to the rescue - initially digging out where we think the pipe should be until we found the shattered and collapsed remains of it.
Once we'd found both ends and cleared the collapsed exit, it was clear that the collapse had caused the rest of the pipe to back up with silt and mud - and that no water was going to come through any time soon. So we set to work with the flexible drain cleaner and an extended plastic pipe trying to ram the mud blockage through
We plugged away for about 40 minutes with absolutely no joy - it really wasn't shifting. The Dutch gods of the waterways were not happy and not willing to help out until W provided a blood sacrifice to satiate them. The pole that he was jamming into the top end of the pipe snapped and sharded, cutting his hand deep into the webbing between finger and thumb. I was down at the ditch end, and as he cursed and jumped around the field making pained noises, I heard the wonderful sound of rushing water as it came tumbling through the pipe .
The water's draining away steadily - let's hope that by tomorrow morning my fruit trees have dry toes again. We will have to re-lay the pipes again - its pretty clear that the current pipes are pretty knackered and worn. Given the frost forecast, I want to leave that til the spring if we can!
Labels:
fruit,
gardening,
Holland,
Netherlands,
orchard,
renovation
Friday, 20 November 2015
Organizing paint
When you set out to paint a whole house in a very short space of time with a large and changing number of people, organisation is pretty key. I'm not the world's most organised person - I describe myself as chaotically tidy, in that I've a passion for a clean and tidy house, but I have never mastered the art of replacing everything immediately in its home location the second it is finished with. I have done project management for many years as a trade though, so I know that planning is key to success.
In an earlier post, I talked about the importance of having an idea of the character you want to build in a home, and what colors you plan to choose. I spent a lot of time in Pinterest looking for design ideas, created my own boards, used Design Seeds for color palette selection and used Evernote for co-ordination.
Having the color palette and design ideas early, meant that we could take advantage of flash sales on paint in DIY stores and start to build stock up before we had people on the ground. It was also pretty vital to have a good stock of paints early : regular runs to the DIY stores are fun, but highly time consuming and definitely eat into your action run rate. We didn't avoid them completely - far from it, but we definitely improved on our ratio from the summer before at the old house. However this left us with a small mountain of paint tins, generally in exactly the same design bar a small printed sticker from the color mix machine.
I came up with the idea of making a couple of small binders with room colors and instructions. Each page had one room : the primary areas called out (ceiling, walls, wood, accent wall) and matched with the paint color details - and a swatch from the paint chips in the store taped to it. These were stored at strategic locations ( the kitchen, near the kettle & tea, near the coffee maker) so that people could check what their next color or task would be. It's a little battered now from being well thumbed, but it is still super useful for reminding myself of exact colors for touch ups and fixing small boo-boos that appear over time. So far, I haven't run out of paint, but in previous homes it has enabled me to go and get new pots long after I would otherwise have completely forgotten my choices. Each paint tin was marked with an outsized strip of masking tape on both the side AND the top, with a clear statement of room name, and what area it was intended for. Initially it was in big bold black, but as we ran through tins, and had to relabel, it was what ever writing implement we could find. It's important to have it on both side and top : they do get stacked and having to lift off 3 other pots to see if it's the right one at the bottom is a nuisance, having it on top makes it much more eye catching. Having a a common nomenclature for rooms and paint areas helped a great deal, although we still ran into the odd hiccup - mostly when I changed the room name on the fly!
Paint brushes and trays were the next organisation hurdle. With a couple of professional decorators in the team, we took on board their advice that since we had colors that would span multiple rooms, and multiple coats of the same color, we shouldn't clean out the equipment at the end of each painting session, but instead to wrap in airtight plastic bags until the next use point. It saved us a great deal of time (and wasted paint) in clean up but we learned a few lessons along the way :
- Don't forget to label the plastic bags with the color. They get moved around and it's super hard to identify the different tint shades the next day if you paint in shades of white as I do. And realizing you are on the wrong color halfway across a wall is super frustrating!
- Do plan to have a lot more brushes, rollers and trays than you originally thought neccessary. I had assumed that one per person would be enough with a few spares, but with people painting multiple colors in a day, that number rocketed up.
- Do have a clear plan to decommission and clean up trays for paint colors which are complete : we had quite a few trays that could have been cleared up earlier hanging around, and since we ran out people would wander around grabbing bags that looked out of service in order to equipment themselves with the expected infuriated result when the original painter came back off tea break.
Masking tape is important for stopping paint from travelling too much, and we used a lot of reels on windows and doors. But there is always a little bit of travel and clean up. I tried again to do accent walls in much darker colors, but I still can't get straight clean lines down the edges. I've tried all sorts of tiny thin brushes, and even masking off areas, but so far it's still smudgy. I've just heard that there is a new decorators masking tape by Frog, which stops the paint from running underneath it - maybe I'll try to do some touch up with that. How do you get straight lines in paint? What is your tip for success?
Wednesday, 18 November 2015
Fall maintenance
Until I moved to this house, fall maintenance was not something I spent a lot of time on. If I remembered, I serviced the boiler, if not I just hoped it kept running through the winter. I move a sleeping bag, a paperback and some cereal bars into the car, because the first snows of the winter always cause crazy traffic jams.
Here in North Holland, we've found so much more to do and with winter closing in, W has been super busy. All the gutters around the roof have to be declogged every few weeks to make sure they don't block up and flood the house.He's been shifting garden furniture into winter storage, and making sure that the thatch looks in top condition. The spiders have been crazy busy all autumn and the windows are covered with cobwebs - so, cleaning time, to make sure we get the most possible light into house during the dark winter days. The olive trees and other tender plants need to be brought in to avoid frost damage, and the stables need closing up now that the swallows have left.
What are your autumn rituals? How do you prepare for winter?
Luca's New Name
I've always been bemused by racehorse names, and pedigree animals are pretty much the same. Strange multilevel names that seem to have no connection to the animal. After a couple of pedigree animals you'd think I'd be used to it but today I received Luca's papers.
May I introduce Giant Angel Ultimate Edition!
Tuesday, 17 November 2015
Crumble 'n' cream
This summer has been all about trying to reduce some of the rampant weeds that have taken over the house garden. We've been digging and weeding and cutting and trimming .....and cussing politely lots as we suck prickled fingers or chew on stung forearms.
I took a call pretty early that we wouldn't clear the brambles near the main shed - I could see we had quite enough to do with the rest of the property. This was a source of wild food as soon as autumn came around - our first crop of own fruit in North Holland.
Blackberries are quite pippy, but they have beautiful rich flavours that are just divine baked in a crumble served with a nice dollop of cream. In fact, a fruit crumble is my go-to recipe for resolving any fruit glut, when the freeze just can't take anymore.
Crumbles come in two parts : the topping and the filling.
Let's start with the topping - the classic 'mix' calls for 1 part flour to 1 part fat and 1 part sugar by weight. The drier and 'crumbier' you want your topping to be, the more fat/sugar you should add until it is almost equal parts in weight. If you love the crispy biscuity topping style but want to keep the calories down, increase the fat, and not as much of the sugar. I personally try and always use butter for the fat, unless I have friends over who can't take milk/lactose products - I find that margarine and other such products produce much less crispy results.
You can also mix the plain flour with other ingredients to give it texture and flavour - replace some with a replacement amount of almond meal or oats to give a nuttier or crunchy top. A touch of cinnamon or ginger in the topping to match with a flavoured filling gives a little zing.
For the fillings you can use combinations of most berries and orchard fruits - household favourites are apple, plum, blackberry, and rhubarb. Spread into the base of the baking tin, sprinkle with sugar or sweetener of choice ( honey, agave syrup, maple syrup) and spice up as desired ( cinnamon, ginger, cloves). Here in the Netherlands, I use speculaas spice - a lovely premixed winter cookie flavouring. I rarely pre-cook the fruit unless they are particularly hard or particularly acid as my circle like quite sharp, solid fillings - rhubarb and hard cooking apples are the only two that get a quick zap in a pan with water and sugar beforehand.
When you fill the baking dish with your filling, be aware that the softer the fruit you use in the filling, the more crumble topping you will need as the base of the crumble (crumble DMZ!) will absorb liquids and become a sweet flavoured doughy textured mass. So make sure you make lots of topping - and don't worry if you have too much as you can easily freeze it and use it straight out of the freezer later on.
Pop into a pre-heated oven at 180C/350F and cook for 30 minutes or until bubbling and crispy. If you have little volcanic explosions through the crumble, you either cooked it too long or your crumb was spread unevenly and too thinly. Never mind, they taste divine anyway!
Lastly devour with cream, or custard or evaporated milk. Be careful if it's just come out the oven - the sugar stays hot quite a while!
Monday, 16 November 2015
Autumn's gold
Some of these posts may seem a little bit out of sequence because I am playing catch-up on a summer's worth of work in my blog. But the autumn weather has been beautiful - grey clouds shooting across the sky, winds whipping around corners, catching leaves and scattering them across the garden like stolen treasures. It's a constant battle to keep the concrete clear of leaves so that the cars have grip and grass disappears overnight in a golden blanket.
I just had to share a few pictures of my 2 favourite men playing in the leaves. Luca's been having a complete blast and is burning up so much energy kicking up the leave piles, that he's curled up asleep from about 6 in the evening onwards. As you can see, it's not just Luca having fun!
Quick tool update - the Stihl kombisystem has come into play again. We were super excited to find that it has a leaf blower attachment. It's cheaper than buying a standalone leaf blower - and because the base engine has to be capable of cutting brush, it's much more powerful than most blowers on the market. I'm also grateful for the ear defenders - it doesn't get any quieter!
We've been using an old silo bin as storage for our compost and garden waste - it drops about 2 feet down below ground level and is well contained to stop leaves from blowing out. With every run to the silo, I feel more and more like Smaug the dragon building my own personal gold mountain.
Sunday, 15 November 2015
Montreal
As it's been cold rainy and grey, I've decided to take a quick look back at somewhere much sunnier (then) !
Just before I got the keys to the new place, work kindly sent me to Montreal, Canada for conference. This is always a busy time, but I decided to stay on for a long weekend and meet up with family and friends in the area.It's been a long time since I've been to Canada - the best part of 15 years and a lot has changed. Montreal's economy has clearly struggled in the interim and this lack of cashflow has definitely left it's mark on areas of the city.
As I was in the centre of the city, I couldn't resist a visit to Notre Dame Basilica in Place D'Armes Square. It is Gothic, colorful and unmissable as you walk in through the front doors. This amazing photograph by Adrian Hu gives you a sense of how you drown in color and light as you walk down towards the ornate altar at the nave of the church
At the rear of the building there is the Sacre-Coeur Chapel which is like stepping out of a kaleidescope and into an autumnal frieze. It was destroyed by arson in December 1978 and has been completely rebuilt in a modern style. I adored this winding staircase that just meandered up into heaven.
It was also the Montreal beer festival that weekend -I really couldn't pass up on the opportunity to test out some local food and drink in a sunny cheerful environment full of happy people.Firilst up was a beavertail or 'queue de castor'. its a lovely gooey doughey deep fried pastry - a lot like a doughnut - covered with a choice of sweet toppings. I tried the apple & cinnamon; as well as the chocolate and maple syrup - both divinely calorie laden treats.
I had the chance to sample a few of the local brew - this one was light and refreshing - perfect for a sunny summers day.
To deal with the post beer munchies I sampled 'Poutine' - a French-Canadian fast food favourite of french fries and cheese curds topped with a rich gravy. It's filling, tasty, filled with salt and really quite addictive. The curds are 'squeaky'- not made in the traditional way by weighting and pressing to release whey but by cooking and allowing to mature to develop their unique flavour and texture.
It is quite a heavy dish for summertime, but the queues speak to the enthusiasm the Quebecoise have for their national dish - even in the middle of the afternoon the Poutine vans had long trailing queues that stretched across the grounds with people waiting for their chosen dish & toppings.
Lastly I'd love to introduce you to a new friend of mine - 'coons run wild in Montreal, a lot like the urban fox in London. This chap had no fear at all, running around and through the tourist to dig through bins and explore for tasty titbits for dinner.
Montreal is beautiful - and a wonderful place to visit - don't forget to say hi to Charlie, here!
Thursday, 12 November 2015
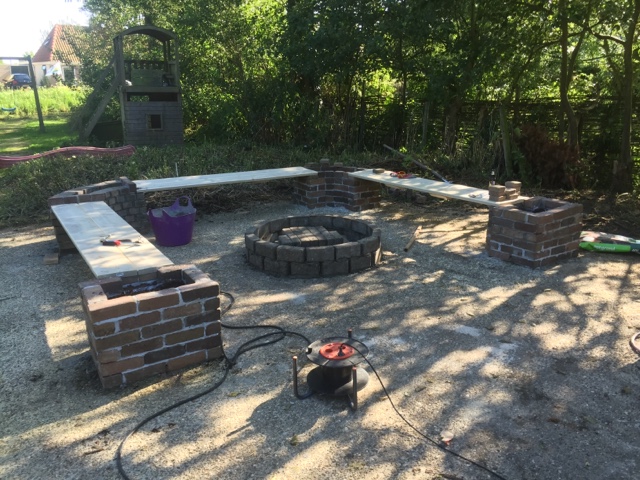
Marshmallows 'n' meat - building a fire pit area
As we planned the first tranche of work on the house - the 'must do before the house is fit to live in' work - I got a message from W :
'I want one'
Clearly, this was indeed a mission-critical component, and no red-blooded Dutchman would ever move into a new house (even a thatched one) without a substantial flame source on which he can char large amounts of meat. Being a nice person, and well, wanting the Dutchman to feel welcome, I agreed and broached the subject of the additional workload with the 4 man work crew - I, D, A, & M. I expected groans of dismay and complaints that actually I was asking them to do far too much in far too little time. Instead, they all agreed immediately with the vitality of this home component and dived into planning. Evenings were spent poring over scribbled diagrams with approximate measurements discussing the pros and cons of different building approaches, all with bottles of beer in hand. Finally a design was chosen, a location was sourced and our collection of random spare bricks started to get put to a good use.
We had a lot of shaped bricks that had been used to make a pattern in an old driveway which D used to make the corner stands. I loved the beautiful curves in the initial bench base, but wasn't so sold on the decision to have the bench's positioned so that you saw nothing of the garden but stared at a scrubby fence through the fire. With great innovation, D promptly set to work on making it a 3 bench rather than 2 bench barbecue site which made everyone happy - extra seating to move around as you try to avoid the Smoke Fairy. D used a concrete mix that was quite high strength and self mixed here in the garden. You can buy ready mixed bags that you only need to add water to, but they cost a lot more that buying some Portland cement, some sand and a mixer. We used a Dutch brand - Swinko - but something like this one should also work. Although you can do this all by hand, the mixer makes a huge difference to how much work it is to prepare everything before you can even get started.
After a day of laying bricks the main benches and their stands were all in place, and D has started on the central circle for the firepit. We invested in heat resistant cement to help withstand high temperatures here - ordinary concrete may simply crack and break when exposed to heat & flame. As we knew we were going to be putting a cast iron fire pit for the actual cinders, we didn't have to build the whole circle with it, and just made sure the inner areas were secure. Because we were going to have a tripod stand for the grill and for hanging pans from, D left 'footholes' at the base of the ring to keep the tripod secure and safe from being tripped over in the dark.
Here's the completed barbecue area, with the brickends planted up with aromatic lavender and rosemary - lavender to brush against, rosemary to sprinkle on your steak or chicken breast on the grill. And of course, once you've built a firepit, you have to test it and just *HAVE* to roast marshmallows on it. So here's a quick picture of the crew testing marshmallow and beer combinations at the day's end.
It's seen a lot of use since, with all ages enjoying marshmallow in various forms of toastyness.....and yes, they had meat on the grill as well.
Labels:
DIY,
gardening,
Netherlands,
renovation,
tools,
upcycling
Dutch babies
I'm not turning maternal on you, I promise - but I do like making Dutch babies! They are really a misnomer, as the name is derived from the American Pennsylvania Dutch or 'Deutsch' as they should really be - it's a German 'pfannkuchen' recipe that has had some tender loving care in America. It's perfect for breakfast or brunch - and feeds an army of hungry workers in the middle of the day with little preparation & effort.
In England, we've long had a passion for Toad-in-the-hole and Yorkshire puddings as evening meals or accompaniment with Sunday roast dinners. This is another dish in the same vein - a rich pancake batter which is oven baked in very hot fat at a high heat to puff up into lovely fluffy clouds of crispy deliciousness. The big difference to a Yorkshire pudding - where you add all the toppings in afterwards (onion gravy, sausages) - is the inclusion of the flavour ingredients as part of the batter in the cooking. I take quite an experimental approach to it and add what I have in the fridge but for the less enthusiastic here's some tips :
Savoury babies :
- cubes of feta or halloumi
- bacon or pancetta strips
- pepperoni slices
Sweet babies :
- apple slices
- cherry pieces
- sugar & lemon
To make the basic Dutch Baby you want :
1/3 cup of all-purpose flour
1/2 cup of milk
2 beaten eggs
salt & pepper to taste ( nutmeg or cinnamon if sweet)
Mix all the above ingredients into a smooth batter. Preheat the oven to 425 degrees , and prepare a metal tin with small cubes of butter or other fat, sufficient to create a thin layer of oil in the base. Heat the tin in the oven until the fat is lovely & smoking hot. Bring out, and fill with the batter and additional ingredients. Cook in the oven for 15-20 minutes until the pancake is puffy, goldenbrown and set through. Don't open the oven whilst it's cooking because it will collapse and you will lose all the lovely airspaces that form the crispy edges.
If you are feeling experimental you can go as far as mix'n'matching in the same time so you have both main and dessert in the oven at the same time - as in the picture below. You have to be very quick with laying out the ingredients, as you can't mix them into the batter beforehand and you want to make sure the oil/fat layer doesn't lose all it's heat whilst you put the contents in.
Happy Baby making & Baby eating. My, that sounds so wrong - and yet so right!
Orchard time - part 1 (getting diggy with it)
The Old Apple Orchard, Wisbech St. Mary by Michael Shirley |
One of the main reasons I chose this house was because I wanted to be able to grow my own fruit and vegetables. I've been a long time reader of sci-fi and fantasy, and in most fantasy novels the protagonist wanders through an orchard and takes refuge sitting in or under an old fruit tree. I love the old orchards you see dotted around both the Dutch and British countryside, with gnarly mature trees spaced out irregularly across a field which is grazed by fluffy cloud-sheep. I tried to get apple trees growing in my old UK home, but never really had either the time or the space to make a genuine orchard. Most trees take up a lot of space and resources in an urban garden unless you aim for mini-varieties, such as 'ballerina' apples, which I did . There is also growing trend in multi-fruit trees where you can have multiple different varieties grafted on to a single root stock , so can have more options in a smaller space. The lack of space didn't spoil the joy of being able to harvest your own fruit and eat perfectly ripe, perfectly fresh luscious plums and apples during the summer. And it's particularly exciting to be know that the varieties are heritage ones, not something you would be able to purchase in a supermarket or grocers shop. For those of you in the UK, I highly recommend the Brogdale Trust which is the home of the National Fruit collection and sells a wide range of heritage trees. However, I've always wanted an idyllic grassy orchard to spend a summer afternoon reading in, and the lure of a field I could plant up was far too much to resist.
With most fruit trees, it's not enough to buy the trees. You need to make sure you can actually get fruit from them. Hold on to your seats, folks - we are about to go super technical and deep dive into a hidden world of apple tree sex. There's a lot of similarity in other fruit ( pears, plums, cherries ), and in order not to bore you I'm going to stick to apples which is the majority of our stock.
Let's start with genetics! Most apples are 'diploid' - have two sets of chromosomes. These chaps are the norm in fruit stock. A few are self pollinating (happy chaps!) - can create fruit from their own blossom - but most have to have pollen from compatible partners, and are often picky daters. The key to attaction is all in the timing : early bloomers will pollinate other early bloomers, early-mid will pollinate early mid etc through 4 groups. Although there is some crossover between groups, you are gambling that the season is clement and that the blooms are around at the same time. Some apples though are 'triploid' - three sets of chromosomes. These chaps are essentially mules - sterile. They don't pollinate other trees reliably if at all, but they can be pollinated by other trees. So,good to have for the fruit, but don't count them in your pollination rota.
With the potluck approach to buying trees, having a list of pollinating groups is super important. The Royal Horticultural Society have a useful PDF which you can print or save on a phone or a tablet to take with you when shopping. It's a little limited once you cross out into the EU as suddenly there are lots of varieties which aren't commonly found in the UK. That said, with a bit of extra google help and the assistance of the garden centre staff, I have pollinating partners for most if not all of the trees. Those that are missing will have to be a special order at a later date - but definitely this winter, before it's too late to plant trees.
Planting is simple if hard work : the soil is fertile, but has large lumps of clay in it. For each tree, we needed to dig a hole that was at least a yard wide in each dimension and boy did people feel that the next day! Then add lots of lovely compost, some fertilizer, the tree itself and bed in with the soil previously dug. A lovely tip from a knowledgeable digger - if you are digging through turf, you can place the turf layer upside down ontop of the tree hole to help keep the non-grassy area clear. The grass will die off, and will act as a supressant, slowing down the regrowth of the grass back into the hole. And with such young trees, keeping a square of clear land around them is important to give them the best start in life. We staked each tree on the side of the prevailing wind - discovering as we did that the prevailing winds in this part of North Holland are completely un-intuitive and definitely completely different to the UK. to attach the trees to the stake, I am used to rubber tree bands and was surprised to find that the nursey recommended using what looked like safety belt material from car seat belts. I decided to give it a try and it's up and supporting the trees so I won't get the opportunity to see if I can upcycle it from a car scrapyard - but it seems like a clear re-cycling opportunity , rather than buying from new. For the couple of remaining trees still lacking a tie, I will be using the tried and tested route of old laddered tights.
After a couple of weekends of hard work - made much easier by some very kind helpers both times -there is now the start of a beautiful orchard at the bottom of the garden. W is even starting to look like a young farmer !
Let's start with genetics! Most apples are 'diploid' - have two sets of chromosomes. These chaps are the norm in fruit stock. A few are self pollinating (happy chaps!) - can create fruit from their own blossom - but most have to have pollen from compatible partners, and are often picky daters. The key to attaction is all in the timing : early bloomers will pollinate other early bloomers, early-mid will pollinate early mid etc through 4 groups. Although there is some crossover between groups, you are gambling that the season is clement and that the blooms are around at the same time. Some apples though are 'triploid' - three sets of chromosomes. These chaps are essentially mules - sterile. They don't pollinate other trees reliably if at all, but they can be pollinated by other trees. So,good to have for the fruit, but don't count them in your pollination rota.
With the potluck approach to buying trees, having a list of pollinating groups is super important. The Royal Horticultural Society have a useful PDF which you can print or save on a phone or a tablet to take with you when shopping. It's a little limited once you cross out into the EU as suddenly there are lots of varieties which aren't commonly found in the UK. That said, with a bit of extra google help and the assistance of the garden centre staff, I have pollinating partners for most if not all of the trees. Those that are missing will have to be a special order at a later date - but definitely this winter, before it's too late to plant trees.
After a couple of weekends of hard work - made much easier by some very kind helpers both times -there is now the start of a beautiful orchard at the bottom of the garden. W is even starting to look like a young farmer !
Subscribe to:
Posts (Atom)