
As we planned the first tranche of work on the house - the 'must do before the house is fit to live in' work - I got a message from W :

'I want one'
Clearly, this was indeed a mission-critical component, and no red-blooded Dutchman would ever move into a new house (even a thatched one) without a substantial flame source on which he can char large amounts of meat. Being a nice person, and well, wanting the Dutchman to feel welcome, I agreed and broached the subject of the additional workload with the 4 man work crew - I, D, A, & M. I expected groans of dismay and complaints that actually I was asking them to do far too much in far too little time. Instead, they all agreed immediately with the vitality of this home component and dived into planning. Evenings were spent poring over scribbled diagrams with approximate measurements discussing the pros and cons of different building approaches, all with bottles of beer in hand. Finally a design was chosen, a location was sourced and our collection of random spare bricks started to get put to a good use.

We had a lot of shaped bricks that had been used to make a pattern in an old driveway which D used to make the corner stands. I loved the beautiful curves in the initial bench base, but wasn't so sold on the decision to have the bench's positioned so that you saw nothing of the garden but stared at a scrubby fence through the fire. With great innovation, D promptly set to work on making it a 3 bench rather than 2 bench barbecue site which made everyone happy - extra seating to move around as you try to avoid the Smoke Fairy. D used a concrete mix that was quite high strength and self mixed here in the garden. You can buy ready mixed bags that you only need to add water to, but they cost a lot more that buying some Portland cement, some sand and a mixer. We used a Dutch brand - Swinko - but something like this one should also work. Although you can do this all by hand, the mixer makes a huge difference to how much work it is to prepare everything before you can even get started.
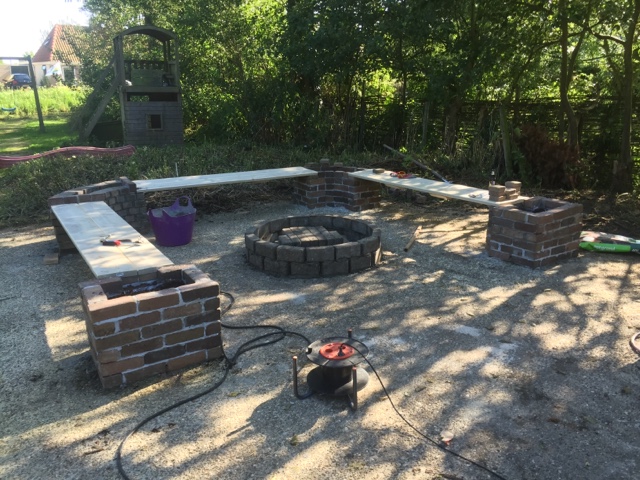
After a day of laying bricks the main benches and their stands were all in place, and D has started on the central circle for the firepit. We invested in heat resistant cement to help withstand high temperatures here - ordinary concrete may simply crack and break when exposed to heat & flame. As we knew we were going to be putting a cast iron fire pit for the actual cinders, we didn't have to build the whole circle with it, and just made sure the inner areas were secure. Because we were going to have a tripod stand for the grill and for hanging pans from, D left 'footholes' at the base of the ring to keep the tripod secure and safe from being tripped over in the dark.

Here's the completed barbecue area, with the brickends planted up with aromatic lavender and rosemary - lavender to brush against, rosemary to sprinkle on your steak or chicken breast on the grill. And of course, once you've built a firepit, you have to test it and just *HAVE* to roast marshmallows on it. So here's a quick picture of the crew testing marshmallow and beer combinations at the day's end.

It's seen a lot of use since, with all ages enjoying marshmallow in various forms of toastyness.....and yes, they had meat on the grill as well.

A most excellent use of the area!
ReplyDelete